Pumpkin-Specific Modifications
When it comes to competitive pumpkin launching, trebuchets have established themselves as the medieval catapult of choice. Whether you're participating in a pumpkin chunkin' competition or just looking to add some medieval flair to your autumn festivities, constructing a pumpkin trebuchet requires careful planning and specific modifications to ensure maximum distance and accuracy.
Understanding the Trebuchet
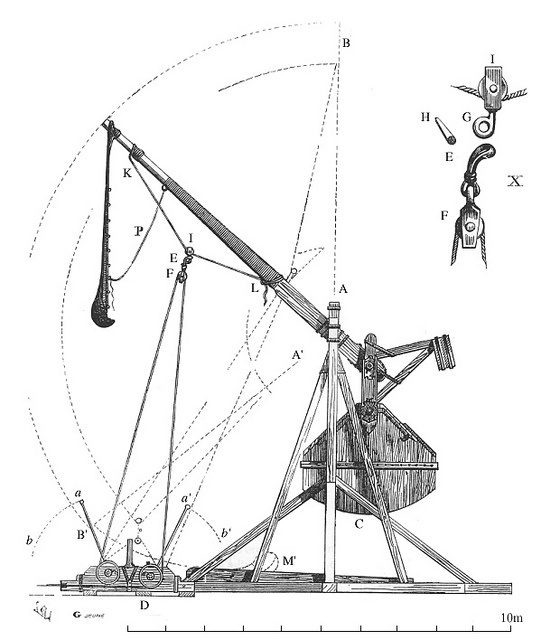
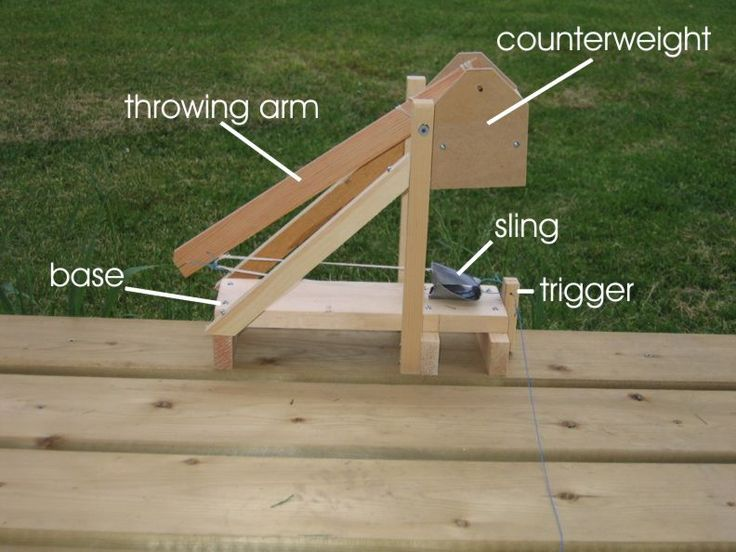
A trebuchet operates on the principle of a long lever mounted on a pivot, using gravitational forces to hurl projectiles. The main components of a trebuchet include:
- The Frame: Provides structural support.
- The Arm: The swinging section that launches the pumpkin.
- The Counterweight: Generates power for the trebuchet through gravitational force.
- The Sling: Holds and releases the pumpkin.
- The Pivot Point: Allows the arm to swing, critical for motion efficiency.
Key Modifications for Pumpkin Launching
While basic trebuchet design remains consistent, certain modifications are essential for effectively launching pumpkins:
1. Reinforced Frame
Pumpkins are notably heavier than traditional stones or balls typically used in trebuchets. As such, reinforcing the frame is critical:
- Use durable materials like metal or treated wood to withstand the added stresses.
- Consider triangular bracing to prevent the frame from collapsing under the projectile's weight.
2. Optimized Arm Length
The length of the trebuchet arm significantly impacts the projectile's distance:
- A longer arm allows for greater acceleration and increased distance.
- However, a longer arm requires a stronger support system and counterweight to balance the added torque.
3. Heavier Counterweight
A heavier counterweight provides more energy and, consequently, a longer throw:
- Calculate the counterweight needed by considering the pumpkin's mass and desired distance.
- Easily adjustable weights allow fine-tuning for specific conditions and pumpkin sizes.
4. Custom Sling Design
Given the irregular shape of pumpkins, a custom sling is essential:
- The sling should cradle the pumpkin securely without adding excessive friction.
- Test different materials for the sling to find one that minimizes slippage and maximizes release consistency.
5. Adjustable Release Mechanism
The release angle of the trebuchet arm is another factor in achieving optimal launch distance:
- Implement an adjustable pin or hook system that allows for varying the release angle.
- Experiment with release timing to ensure consistent launches and prevent pumpkins from achieving suboptimal trajectories.
Safety Considerations
Safety is paramount when constructing and operating a pumpkin trebuchet. Here are some important considerations:
- Area Selection: Choose a wide, open area free of trees, power lines, and people.
- Structural Soundness: Regularly inspect the trebuchet for wear and vulnerability to prevent accidents.
- Protective Gear: Use helmets and safety goggles when operating the trebuchet.
- Team Communication: Establish clear signals and communication during launching to ensure everyone's safety.
Testing and Calibration
Constructing a pumpkin trebuchet is only the beginning. Success in pumpkin launching requires regular testing and calibration:
- Begin with smaller test launches to evaluate performance and identify adjustments.
- Record data on various launch parameters such as distance, trajectory, and angle for comprehensive analysis.
- Optimize settings systematically, focusing on improving one aspect at a time, such as counterweight mass or sling release timing.
Conclusion
Building a pumpkin trebuchet is a challenging but rewarding endeavor. By focusing on specific modifications tailored for pumpkin launching, you can enhance performance and improve competition outcomes. With safety and patience, your trebuchet will be ready to impress at any pumpkin launching event. Happy chunkin'!