Module 8 . Capstone: Summer Pattern Literacy
Six Projects • One Portfolio • A Summer’s Worth of Seeing
Table of Contents
The Threshold
The goldenrod is just starting to yellow. Not the full blaze yet — not the deep, almost reckless gold of September — but the first flush, the leading edge of that color, the way a match looks the instant before it catches. You notice this standing at the top of the hill you have climbed all summer. The cicadas have reached their full volume now, that throbbing wall of sound that makes the air itself feel thick, and the light has begun its slow pivot toward amber. Evenings arrive earlier. Shadows stretch longer. The creek that ran full in June is running lower, quieter, its stones showing their dry backs for the first time since spring.
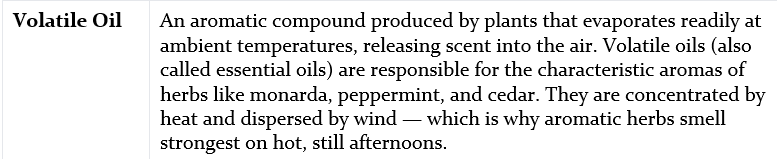
You stand here with a full journal. The pages are wrinkled from humidity, stained with walnut hull and monarda oil, dog-eared at the entries that surprised you. Your fingers carry the faint green-black residue of a summer spent crushing leaves, pressing petals, rubbing stems between thumb and forefinger to release volatile oils you can now name. In your bag: bundles of dried yarrow, a tin of linden blossoms, a jar of elderflower vinegar you made in July. On your skin: the residue of the boundary blend you mixed last week, cedarwood and wild bergamot, still faintly warm at the wrists.
You have spent an entire summer walking ridges, reading hollows, tasting creek water, watching thunderheads build and break, mapping the invisible architecture of heat and shade and moisture that governs everything that grows in this landscape. You have done sensory labs at the kitchen table and field sketches on limestone ledges. You have brewed cooling teas and after-sun oils. You have noticed things — in the land and in yourself — that you did not know how to notice before.
Now it is time to gather..

Course Context
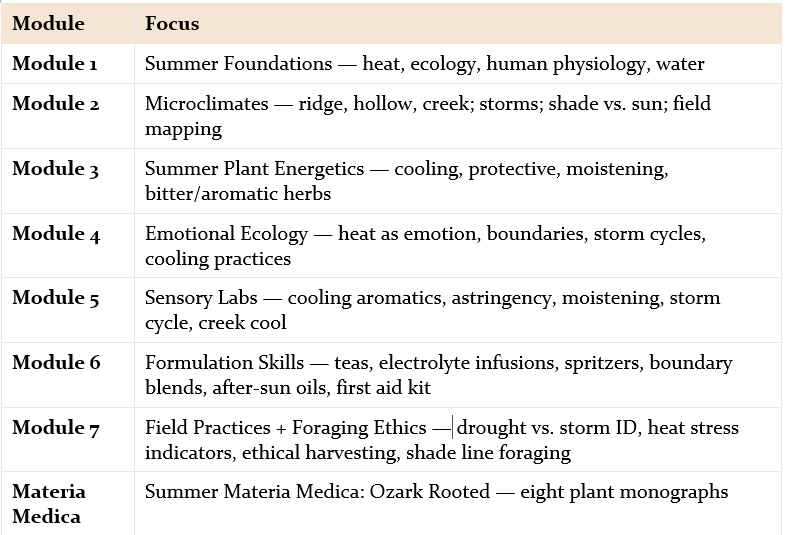
This capstone integrates everything you have explored across seven modules of Summer Pattern Literacy — a self-study course in sensory-ecological herbal education rooted in the Ozark landscape. Each module built a layer. Now you weave them together.
The Capstone Portfolio
Your capstone is a portfolio of six interconnected projects. Each project stands alone, but together they form a complete record of your summer pattern literacy — a document that is part field journal, part herbal formulary, part personal reflection, and part sensory archive. The portfolio can be assembled in a binder, a handmade journal, a wooden box, or a combination of formats. What matters is not the container but the coherence: the sense that one student walked one landscape through one summer and came back carrying all of it.
Project 1: The Summer Sensory Map
One Day, One Place, All Five Senses
Overview
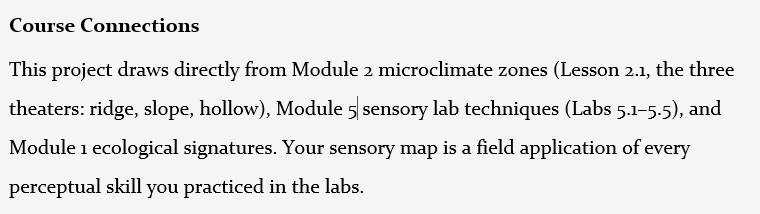
You will create a hand-drawn or mixed-media map of one location on one summer day, recording sensory data across all five senses. This is not a botanical illustration. It is not a topographic map. It is a sensory autobiography of a place at a specific moment in time — the way a hillside smells at two in the afternoon when the sun has been on the wild bergamot for three hours, the way the creek sounds from fifty yards upslope versus standing in it, the way humidity sits in the hollow like a held breath. This map draws from Module 1 (ecological foundations), Module 2 (microclimate zones), and Module 6 (sensory lab techniques). It is the most spatial project in the capstone, and for many students it will be the most revelatory. A place you think you know well will show you layers you have never consciously registered.
Detailed Instructions
1. Choose Your Site and Day
Select a specific site — a hillside, a creek stretch, a glade-to-hollow transect, a garden, a backyard, a cemetery edge, a farm road. The site should be somewhere you can spend 2–3 hours moving slowly and safely. Choose a day when you can be fully present. Check the weather: the map will be richer on a day with some thermal variety (partly cloudy, approaching front, or morning-to-midday shift) than on a uniformly overcast day, though any conditions are valid.
2. Gather Your Materials
● Large paper (11×17 or larger recommended)
● Colored pencils, watercolors, or markers — you need at least five colors for your five sensory layers
● A clipboard or hard surface for field drawing
● A notebook for written observations that won’t fit on the map
● A watch or phone for time stamps
● Optional: a thermometer, a camera for supplemental photographs
3. Map the Five Sensory Layers
Move slowly through your site. At each stop, attend to each sense deliberately. Record and map the following layers, each with its own color or symbol system:
HEAT — Where does heat accumulate? Where does it release? Mark radiant zones (exposed rock, south-facing slopes, asphalt edges), shade pockets (north-facing hollows, canopy interiors, creek corridors), and thermal transitions (the line where sun meets shade, the temperature drop as you descend into a hollow). Use warm colors — reds, oranges — for heat accumulation, and cool blues for release zones.
SMELL — Where do aromatics concentrate? Mark volatile corridors (paths where aromatic plants line both sides and the scent tunnels), petrichor zones (if there has been recent rain, where does the earth-smell concentrate?), resin pockets (cedar groves, pine stands), and fungal signatures (rotting wood, damp leaf litter, creek-edge decay). Note wind direction and how it carries scent. If you can identify specific plant aromatics — monarda, mountain mint, sassafras — name them.
SOUND — Where is the cicada wall loudest? Where does creek sound dominate? Where is silence — or the closest thing to it? Map the acoustic zones: the high-frequency insect drone of the open glade, the lower register of moving water, the wind-in-canopy sound of the forest interior, birdsong territories, the crunch of different substrates underfoot (gravel vs. leaf litter vs. moss). Note where sounds overlap and where one sound erases another.
TOUCH — Where is the air humid versus dry? Where does soil shift from gite to loam? Where does bark change texture? Map the tactile landscape: the felt humidity of the creek corridor versus the dry heat of the ridge, the way spider silk catches on your forearms in the understory, the temperature of stones in sun versus shade, the shift from packed clay trail to spongy forest floor. If you wade the creek, note water temperature and current pressure against your shins.
TASTE — Where can you taste the air? Mark ozone zones (before or after a storm), dust (dry ridge, gravel road), pollen (near goldenrod or ragweed stands). If you do a plant crush test — rubbing a leaf and touching it to your tongue — mark the location and note the flavor: pungent, bitter, sweet, astringent, mucilaginous. Only taste plants you have positively identified. Note how taste changes with microclimate — does the same mint taste stronger in sun than shade?
4. Include a Legend
Create a clear legend explaining your symbol system. Each sense should have its own color family or symbol set. The legend should allow someone unfamiliar with your site to read the map and understand what each mark means.
5. Include Metadata
● Date and time range (e.g., “July 18, 2026 — 10:00 AM to 12:30 PM”)
● Weather conditions (temperature, humidity, cloud cover, wind, recent precipitation)
● Location name and brief description
6. Annotate Three “Sensory Surprises”
Include at least three annotations marking things you did not expect — sensory data that surprised you. These might be a smell you couldn’t identify, a temperature anomaly, a place where two senses conflicted (it looked hot but felt cool), or a sound you had never consciously noticed despite visiting the site many times. Label these clearly on the map.
Format
Hand-drawn on large paper (11×17 or larger recommended), using colored pencils, watercolor, or mixed media. Photographs may supplement the map but cannot replace it. The hand-drawn element is essential: drawing forces a slowness and attention that photography does not.
Reflection Prompts
Answer all four of the following in writing (on the back of the map or on a separate sheet). Each response should be at least a few thoughtful sentences.
1. “What sense dominated this place on this day, and why?” — Consider whether the dominant sense is always the same or whether it shifts with weather, season, and time of day.
2. “Where on the map do two or more senses converge most intensely?” — Look for the spots where heat, smell, sound, touch, and taste pile up on one another. What makes those convergence zones significant?
3. “What did the map reveal that walking alone would not have?” — Reflect on what the act of mapping — of stopping, recording, assigning symbols — added to your perception.
4. “How does this map differ from a map you would have drawn before this course?” — Consider what layers you now perceive that were invisible to you in May.
Project 2: Microclimate Field Sketch
A Cross-Section of Summer
Overview
You will create a detailed cross-section sketch of a ridge-to-creek (or equivalent) transect, annotating microclimate zones with temperature observations, humidity notes, plant community lists, soil observations, and at least one same-species-two-zones comparison. If your sensory map was a bird’s-eye view of one place, this field sketch is a side view — a slice through the landscape that reveals the vertical architecture of summer. You are drawing what the hillside looks like if you could cut it open like a layer cake and see all the invisible gradients that govern where plants grow, where moisture collects, and where heat accumulates. This project draws from Module 2 (microclimates and field mapping) and Module 8 (field practices and shade line reading).
Detailed Instructions
1. Select Your Transect
Choose a transect of at least 100 meters that crosses multiple microclimate zones. The ideal transect runs from ridge to creek — ridge top → upper slope → mid-slope → hollow → creek corridor — but adapt to your landscape. If you are in a flatter area, look for a transect that crosses an open field into a tree line and down to a drainage. If you are in town, a park hillside or a ravine behind a neighborhood can work. The key is elevation change and canopy variation.
2. Walk the Transect Slowly
Walk the full transect once without stopping to get a sense of the whole. Then walk it again, stopping at every felt transition — every point where something shifts: the air cools, the canopy closes, the wind drops, the soil changes underfoot, the plant community changes character. These transition points are your zone boundaries.
3. Sketch the Cross-Section
On your paper, draw a side-view cross-section showing the following elements:
Topography: Draw the ridgeline, slope angle, hollow depth, and creek bed in profile. Show the actual shape of the land as you experienced it — the steepness of the slope, the flatness of the creek bench, the way the hollow cups inward.
Canopy Profile: Above the topography line, draw the canopy as it actually appears: open glade (no canopy), edge zone (scattered trees, dappled light), closed canopy (full forest cover), and creek corridor (often a different canopy composition — sycamore, box elder, river birch). Show the height and density of the canopy at each point.
Plant Species (minimum 5):Place at least five plant species in their actual growing positions on the cross-section. Draw them at their correct relative positions — the goldenrod on the sunny upper slope, the jewelweed in the hollow, the monarda at the glade edge, the plantain on the disturbed path, the linden overhanging the creek. Label each species.
Temperature Observations: At each microclimate zone, record a temperature observation. If you have a thermometer, record the actual reading. If not, use body-felt descriptions: “hot and radiating,” “warm but breezy,” “cool and still,” “cold at ankle level, warm at face.”
Humidity Observations: Note humidity at each zone using sensory cues: skin feel (clammy vs. dry), moss presence, fog persistence, dew on leaves, the smell of moisture in the air.
Soil Notes (at 2–3 points):At two or three points along your transect, touch the soil and record: color (red clay? dark loam? gray silt?), texture (sandy, gritty, smooth, sticky), smell (earthy, metallic, musty, sweet), and moisture level (dry, damp, wet, saturated).
Wind Direction and Behavior:Note how wind moves through your transect. Does it funnel down the hollow? Does it die at the creek? Is there an updraft on the south-facing slope? Are there pockets of absolute stillness?
Light Quality Notes:At each zone, describe the quality of light: direct (full sun, no canopy), dappled (canopy gaps, moving shadows), reflected (off water, off light-colored stone), deep shade (closed canopy, no direct or reflected light).
4. Same-Species Comparison (Required)
This is the heart of the project. Find one plant species growing in two different microclimate zones on your transect. This is easier than it sounds — look for monarda on a sunny slope and in a shaded edge, or plantain on a dry path and near a creek, or goldenrod in full sun and partial shade.
For each specimen, collect or photograph a sample and compare:
● Leaf size: Are the leaves larger or smaller in one zone?
● Color: Is there a difference in green intensity, redness, or yellowing?
● Aromatic intensity: Do a crush test on a leaf from each zone. Which is more aromatic? Which has a stronger or more complex scent?
● Texture: Are the leaves thicker, thinner, hairier, smoother?
● Overall vigor: Which plant looks healthier, taller, more robust? Which looks stressed?
Write at least 100 words interpreting the difference through what you learned in Module 2. Why does the same species express differently in different microclimates? What does this tell you about how environment shapes chemistry? Consider how these differences might affect the plant’s usefulness as a medicinal herb — would you harvest from the sunny specimen or the shaded one, and why?
Format
Hand-drawn cross-section on paper, with annotations. May include photographs as supplements. Use a long, narrow format (the cross-section will naturally be wider than it is tall) — taping two sheets of paper together works well.
Reflection Prompts
Answer all four of the following in writing:
1. “How many distinct zones did you cross in your transect? Were there more or fewer than you expected?”— Most students are surprised to find more zones than they anticipated. Every slope angle change, every canopy gap, every seep creates a new microclimate.
2. “Which transition was the most dramatic — the one you felt most in your body?” — Describe the physical sensation of crossing that boundary. Temperature drop? Humidity spike? Sudden stillness?
3. “If you were a plant, which zone would you choose to grow in, and what chemistry would you make there?”— This is a playful question with a serious core. It asks you to think from inside the ecological relationship between place and chemistry.
4. “How does your field sketch connect to your sensory map?” — If both projects document the same site, what does the cross-section reveal that the overhead view does not? If they document different sites, what patterns appear in both?
Project 3: The Three-Herb Cooling Formula
Your Personal Summer Tea
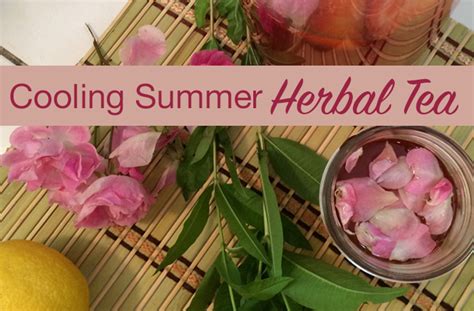
Formulation as creative practice — choosing herbs for function, taste, energetic balance, and personal resonance.
Overview
You will design, prepare, taste, and document an original three-herb cooling tea formula using herbs studied in this course. This project treats formulation as creative practice — not just a recipe but an act of composition, like writing a three-part harmony. You are choosing herbs not only for what they do physiologically (cool, moisten, relax, disperse) but for how they taste together, how their energetics balance, and how the finished tea feels in your body on a hot afternoon. The three-herb limit is intentional: it forces clarity. You cannot hide behind complexity. Every herb must earn its place. This project draws from Module 3 (summer plant energetics) and Module 7 (formulation skills), with sensory techniques from Module 6.
Detailed Instructions
1. Choose Your Three Herbs
Select exactly three herbs from the course materia medica or your own Ozark-rooted additions. Consider the full range of cooling strategies you studied in Module 3:
● Dispersive cooling: Herbs that open the surface and move heat outward (mints, monarda, lemon balm)
● Moistening cooling: Herbs that cool by restoring moisture (linden, marshmallow, violet leaf)
● Bitter cooling: Herbs that cool by draining and descending (yarrow, dandelion leaf, chamomile)
● Aromatic cooling: Herbs that cool through volatile dispersal (lavender, wild bergamot, tulsi)
Think about balance. Three dispersive herbs will make a tea that opens you up but may leave you dry. Three moistening herbs may feel soothing but sluggish. The best formulas create a conversation between strategies.
2. Document Each Herb
For each of your three herbs, write the following:
Why you chose it (energetic rationale):What does this herb contribute to the formula? Is it the primary cooler, the moistener, the flavor bridge? Connect your choice to what you learned in Module 3 about cooling strategies.
Its role in the formula:Designate each herb as one of the following:
● Lead herb — the primary therapeutic and flavor driver
● Supporting herb — deepens or extends the lead herb’s action
● Harmonizing herb — smooths the blend, improves taste, balances energetics
Sensory profile from your own tasting:This is not a textbook description. Taste the herb as a simple (single-herb tea or fresh leaf chew) and record: initial taste, temperature shift (does it cool your mouth? warm it? create a spreading sensation?), texture (thin, viscous, astringent, slippery), and aftertaste (lingering, vanishing, bitter, sweet).
Microclimate association: Where does this herb grow? Ridge? Creek edge? Disturbed ground? How does its habitat inform its energetics? A creek-edge plant that grows in constant moisture may carry that moistening quality into the cup. A ridge-top herb that endures full sun may carry a drying, dispersive intensity.
3. Design the Formula
Proportions by volume: Specify the ratio of each herb (e.g., 2 parts peppermint : 1 part linden : 1 part lemon balm). Explain why you chose these proportions — which herb did you want to lead, and which did you want as a quieter background note?
Preparation method: Choose one of the following and explain why, referencing Lesson 1.4 (water extraction principles):
● Hot infusion — pour boiling or near-boiling water over herbs, steep covered. Best for releasing volatile oils and breaking down cell walls quickly. Choose this when you want a strong, immediate extraction.
● Cold infusion — place herbs in room-temperature or cold water, steep for 4–8 hours. Best for mucilaginous herbs and delicate flavors. Choose this when you want a smooth, moistening tea without the bitterness that heat can extract.
● Sun tea — place herbs in a glass jar of water in direct sunlight for 2–4 hours. A middle path that uses gentle solar heat. Choose this when you want a light extraction with a connection to the summer day itself.
Steeping time and temperature:Be specific. “Steep for 10 minutes covered” is better than “steep until ready.” Note whether you strain immediately or leave the herbs in contact with the water.
4. Prepare and Taste
Make the tea at least twice, adjusting proportions if needed between batches.
First batch — tasting notes:
● First sip: What hits your tongue first? What temperature sensation? What taste?
● Mid-cup: How does the tea evolve as you drink? Does the flavor deepen, shift, flatten?
● Finish: What lingers after the cup is empty? Is there an aftertaste? A body sensation?
● Body sensation: Ten minutes after finishing, what do you notice in your body? Cooling? Relaxation? A shift in breathing? Increased saliva? A sense of settling?
● Emotional effect: Does the tea shift your mood? Does it calm, brighten, ground, or open?
Second batch — adjustments:Based on your first tasting, what did you change? More of one herb, less of another? A longer steep? A different temperature? Document the adjustments and why you made them, then record a second set of tasting notes.
Format
Written document, 300–500 words minimum, with optional photographs of the preparation process. Include the final recipe in a clearly formatted block.
Reflection Prompts
Answer all four of the following in writing:
1. “What is the energetic story of your formula — what does it DO, in one sentence?” — Distill the formula’s action into a single clear sentence. Example: “This tea disperses surface heat while moistening the throat and settling the mind.”
2. “How did the proportions change between your first and second batch, and what did you learn from the adjustment?”— The gap between what you imagined and what the tea actually tasted like is where formulation learning lives.
3. “When in a summer day would you reach for this tea, and why?” — Be specific: mid-afternoon heat? After a garden session? Before sleep on a hot night? The timing reveals your understanding of the tea’s energetic action.
4. “If you could add a fourth herb, what would it be, and what would it contribute?” — This question tests your understanding of what the formula is missing or what direction it could grow.
Project 4: The Boundary Blend
An Aromatic Formula for “Enough”
Overview
You will create a boundary-setting aromatic blend in one of three formats: spritzer, body oil, or aromatic vinegar. This project bridges formulation (Module 7) with emotional ecology (Module 4). It asks you to articulate not just what the blend does herbally but why it matters emotionally and energetically. Boundaries are not just a human concept — they are an ecological strategy. Plants set boundaries constantly: stomata close to conserve water, resins seal wounds, thorns say no further, bark thickens against fire. Your blend is a physical artifact of your understanding that boundaries are both ecological and personal, both chemical and emotional. This project draws from Modules 3, 4, and 7, and it may be the project that surprises you most — because making a blend that embodies “enough” requires you to know what “enough” feels like in your own body.
Detailed Instructions
1. Choose Your Format
Select one of the following formats for your blend:
Aromatic Spritzer (water-based):For face, body, or room misting. Base of distilled water or hydrosol. Light, immediate, dispersive. Good for moments when you need a quick reset — a boundary re-established in a single spray.
Body Oil (oil-based):A carrier oil (jojoba, sunflower, olive) infused with herbs or blended with essential oils. Applied to pulse points, chest, or temples. Slower, more sustained, more intimate. Good for daily ritual — a boundary applied each morning like armor made of scent.
Aromatic Vinegar (vinegar-based):Apple cider vinegar base infused with herbs. For skin cooling, hair rinse, or boundary ritual. Tart, clarifying, astringent. Good for moments when the boundary needs to be sharp and clean — a line drawn in acid and herb.
2. Select Your Herbs (2–4 herbs)
Choose at least one herb from each of the following categories:
A boundary herb:Something that says “edge” or “enough.” Yarrow (the wound-closer, the line-drawer), goldenrod (the late-summer sentinel, bright and unmistakable), cedar (the old boundary-keeper, whose scent says this space is held). Other options: white sage, juniper, sweetgum.
A cooling/dispersing herb:Something that moves stuck heat, that opens what is clenched. Mint (the instant disperser), lemon balm (the gentle opener), monarda (the Ozark fire-starter that paradoxically cools by moving). Other options: wild bergamot, basil, tulsi.
Optional — a calming herb:Linden (the heart-softener), chamomile (the belly-settler), passionflower (the mind-quieter). Add this if your boundary blend needs tenderness alongside firmness.
Optional — a clarifying herb:Rosemary (the memory-sharpener), wild bergamot (the fog-cutter), cedar leaf (the purifier). Add this if your boundary blend needs mental clarity alongside physical cooling.
3. Document Each Herb
For each herb in your blend, write the following:
Why you chose it for boundary work:Connect your choice to Module 4 concepts. What does this herb’s ecology, its growth habit, its chemistry have to do with the act of setting limits? Yarrow’s styptic action stops bleeding — it closes what has been opened. How does that map onto emotional boundary-setting?
Scent profile: Describe the herb’s scent in layers if applicable — top note (first impression, often sharp or bright), mid note (the body of the scent, what lingers after ten seconds), base note (the deep undertone, what remains after a minute). Not all herbs have all three layers, and that is fine.
Energetic action in the blend:What does this herb do in the formula? Is it cooling? Tightening? Dispersing? Calming? Clarifying? Grounding? How does it interact with the other herbs?
4. Prepare the Blend
Include a complete recipe with exact proportions. Here are baseline formulas for each format (adjust to your herb choices):
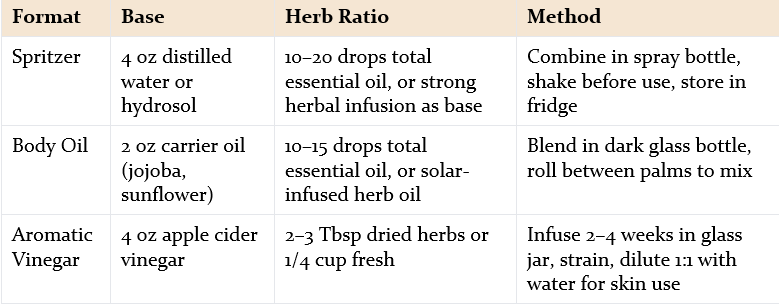
Document the preparation process step by step. Note safety considerations: skin sensitivity (always patch test), phototoxicity (St. John’s Wort and citrus oils can cause burns in sunlight), dilution ratios (essential oils must be diluted in a carrier — never apply undiluted to skin).
5. Use the Blend for at Least 3 Days
Apply or use your blend for at least three consecutive days and document the following for each day:
● When you used it: Time of day, situation, emotional state before application
● Sensory experience: First impression of the scent, how it evolves on your skin or in the air, body sensation (cooling, warming, tingling, settling)
● Emotional effect: Did the blend shift anything? Did you feel more contained, more clear, more grounded? Was the shift subtle or obvious?
● Adjustment notes: Would you change the formula? More of one herb? Less of another? A different base?
Format
Written document, 400–600 words minimum, with the recipe clearly formatted. Optional photographs of ingredients, preparation process, and finished blend.
Reflection Prompts
Answer all four of the following in writing:
1. “What does ‘boundary’ mean to you after this course — how has your understanding changed?” — Think about how Module 4 reframed boundaries from a purely psychological concept to an ecological one. How does seeing boundaries in plants change how you think about boundaries in your own life?
2. “Which herb in your blend carries the most emotional weight for you, and why?” — One herb will feel more personal than the others. Name it and explore why.
3. “Describe a specific moment when you used the blend and felt it work.” — Not a general impression but a particular moment: the time of day, the situation, the scent hitting your wrists, what shifted.
4. “How does the concept of plant boundaries (stomatal closure, resin sealing, thorn production) inform your understanding of human boundaries?” — This is the ecological metaphor question. Which plant strategy resonates most with how you set (or need to set) boundaries?
Project 5: Where Does Heat Accumulate?
A Personal Heat Pattern Reflection
Overview
You will write a reflective essay exploring where heat — literal and metaphorical — accumulates in your life and body. This is the most personal project in the capstone, and it is intentionally placed after the formulation projects. By now you have spent weeks observing heat in the landscape, mapping where it gathers and where it releases, studying how plants manage it, and making formulas that cool and contain. Now you turn that same observational lens inward. This essay uses the ecological metaphors from the course — heat stress, inflammation, boundary fatigue, storm cycles, cooling practices — to map your inner experience. This is not therapy. It is not a diagnostic exercise. It is pattern literacy applied inward — the same skill you used to read a hillside, now used to read yourself. This project draws from Modules 1, 4, and the full course arc.
Detailed Instructions
Write a reflective essay of 500 or more words. Address at least four of the following six prompts. You may address all six if you wish. You may structure the essay by prompt (using the prompts as section headers) or write it as a continuous narrative that weaves multiple prompts together. Handwritten or typed — your choice.
Prompt 1: The Body Map
“Where does heat accumulate in your body during summer? Not just temperature — where do you feel inflammation, tension, irritation, or fatigue? Describe the geography of heat in your body as if you were describing a landscape.”
Think about your body the way you thought about the transect in Project 2. Where are the ridges — the exposed, high-tension places? Where are the hollows — the places that hold cool? Where does heat get trapped? Is it your shoulders, your jaw, your gut, your skin? Describe it with the same specificity you used for the landscape.
Prompt 2: The Life Map
“Where does heat accumulate in your life? Which relationships, responsibilities, or rhythms run hottest? Are there ridges (exposed, intense) and hollows (sheltered, cool) in your weekly schedule?”
Map your week the way you mapped the transect. Where do you spend time on the exposed ridge — in high-demand, high-visibility, high-friction situations? Where do you find the hollow — the sheltered, quiet, restorative spaces? Is there a creek in your week — a place of flow and cool? Or does the whole week feel like a ridgeline?
Prompt 3: The Storm Cycle
“Describe a recent emotional storm cycle in your life using the five-phase model from Lesson 2.2 and 4.2: approach → leading edge → downpour → lull → aftermath. What did each phase feel like? What was released? What was clarified?”
In Module 2, you learned to read the arc of an Ozark thunderstorm: the pressure drop, the green-gray sky, the first gusts, the wall of rain, the strange stillness at the center, and the washed-clean air after. In Module 4, you applied this pattern to emotional experience. Now use it to describe something real — an argument, a breakdown, a cry, a confrontation, a release. Trace the arc. Name the phases. What was the atmosphere like before? What broke? What cleared?
Prompt 4: The Boundary Question
“Where are your boundaries thinnest in summer? Where do you give too much, stay too long, say yes when the body says no? What plant boundary strategy (stomatal closure, resin sealing, dormancy, thorn) most resonates with what you need?”
Summer is the season of open doors, long days, and the cultural pressure to be always available, always sunny, always producing. Where does that pressure wear you thinnest? And when you think about the boundary strategies you studied in plants — the stomate that closes to conserve water, the resin that seals a wound, the thorn that says not here, the plant that goes dormant rather than burn out — which one speaks to what you actually need?
Prompt 5: The Cooling Practice
“What cools you — literally and metaphorically? Describe your most effective cooling practice from this course (breath, shade, water, aromatic dispersal, or something you invented). When do you reach for it? What shifts?”
This prompt asks you to name the thing that works — the practice, the herb, the ritual, the place, the person, the action that brings your temperature down when you are running hot. It might be a tea. It might be a walk. It might be standing in the creek. It might be something you did not expect to work as well as it did. Describe it with sensory detail.
Prompt 6: The Pattern
“What is your summer pattern? If you could describe your relationship to summer in one ecological metaphor — a landscape, a weather event, a plant behavior — what would it be? Has this metaphor changed since you started this course?”
This is the synthesis prompt. After a summer of pattern literacy, what pattern do you see in yourself? Are you the south-facing slope — productive but exposed? The hollow — sheltered but sometimes stagnant? The creek — always moving, sometimes flooding? The goldenrod — late to bloom but unmistakable when you do? Name your metaphor and explore what it reveals.
Format
Written essay, 500 or more words. May be structured by prompt or written as a continuous narrative. Handwritten or typed.
Project 6: Summer Materia Medica Card Set
Your Personal Plant Portraits
Overview
You will create a set of handmade index cards — minimum eight, one for each Materia Medica entry — that function as a portable, personal reference. Each card is a distillation of your direct experience with the plant: not a textbook entry but a lived portrait. What does this plant smell like when you crush it? Where did you find it growing? What did you notice that no book told you? The card set is designed to be carried into the field, consulted at the kitchen table, and added to over time — a living document that grows with you across seasons. This project draws from the Summer Materia Medica, Module 3 (plant energetics), Module 6 (sensory labs), and Module 8 (ethical harvesting and field practices).
Detailed Instructions
Required Cards (Minimum 8)
Create one card for each of the following plants. Where multiple options are listed, choose one or make separate cards for each:
1. Mint family — Monarda (wild bergamot/bee balm), lemon balm, or peppermint
2. Yarrow (Achillea millefolium)
3. Plantain (Plantago major or P. lanceolata)
4. Sumac (Rhus spp. — staghorn, smooth, or winged)
5. Linden (Tilia americana or T. europaea)
6. Elderflower (Sambucus nigra or S. canadensis)
7. St. John’s Wort (Hypericum perforatum)
8. Wild berries — Blackberry, dewberry, or elderberry
You are strongly encouraged to add cards for any additional plants you worked with during the course — chamomile, passionflower, mullein, violet, sassafras, spicebush, or anything else you encountered on the hillside.
Card Front — Include All of the Following
Plant name (common and Latin): Write both. The common name is how you call the plant in the field. The Latin name is how you find it in any reference, anywhere in the world.
Hand-drawn sketch or pressed specimen: Draw the plant from life or from a specimen you collected. If you press a leaf or flower onto the card, secure it with clear tape or a light adhesive. The drawing does not need to be botanically perfect — it needs to be yours, made from observation rather than copying.
Energetic keywords: Three to five words that capture the plant’s energetic profile as you understand it. Examples: “cooling, dispersing, uplifting” or “moistening, soothing, grounding” or “drying, tightening, clarifying.”
Dominant taste: Describe the taste trajectory from your own tasting experience. Examples: “pungent → cool → sweet finish” or “sour → astringent → dry” or “bland → mucilaginous → faintly sweet.”
Sensory signature in your own words: One vivid sentence that captures what this plant is like for you. Not a textbook description. Your own language. Examples: “Smells like a thunderstorm broke open a candy shop” or “Tastes like the creek tastes cold” or “Feels like pressing your hand against cool clay.”
Card Back — Include All of the Following
Habitat and microclimate: Where you found (or would find) this plant. Be specific using the language from Module 2: ridge, upper slope, hollow, creek edge, disturbed ground, glade margin, fence line, roadside. Note sun exposure, soil type, and moisture level if you observed them.
Emotional ecology: What emotional pattern does this plant address? Use the framework from Module 4. Examples: “Yarrow addresses boundary fatigue — it helps when you’ve given too much and need to close the wound.” “Linden addresses heart-heat — anxiety that sits in the chest like a trapped bird.”
Primary preparation method: Tea, oil, tincture, poultice, spritzer, vinegar, or another form — and why you recommend this method for this plant. What does this preparation method extract or preserve that another method would miss?
One personal observation from the course: Something you noticed during your fieldwork, sensory labs, or formulation practice — not something from a book or a website. This is the most important element on the card. Examples: “The monarda on the south-facing slope was twice as aromatic as the monarda in the shade.” “Plantain poultice stopped the itch of a chigger bite in about forty seconds.” “Linden tea tastes completely different cold versus hot — cold it’s almost honeyed.”
Safety notes and harvest window: Note any safety considerations (allergies, drug interactions, photosensitivity, look-alike species) and the best seasonal window for harvesting this plant in the Ozarks.
One ecological metaphor: A single sentence that captures this plant’s role or character through metaphor. Examples: “Yarrow is the fence post of the meadow — it holds the line.” “Linden is the grandmother tree — it holds the shade and the sweetness.” “Plantain is the paramedic of the path — always right where you fall.”
Format
Index cards, 4×6 inches recommended (larger than standard 3×5 to accommodate the required content). Handmade using watercolor, colored pencil, pressed plants, stamps, collage, or any combination. The set should be bound, boxed, or ring-clipped for field portability. Consider a rubber band, a binder ring through a hole-punched corner, or a small box or pouch.
Reflection Prompts
Answer all four of the following in writing (on a separate sheet included with the card set):
9. “Which card was hardest to write, and why?”— Difficulty often reveals the edges of your knowledge. The plant you struggle to describe is the plant you need to spend more time with.
- “Which plant do you feel you know best after this course? Which remains most mysterious?” — Naming both your deepest familiarity and your deepest uncertainty is an act of honest self-assessment.
- “If you could carry only three cards into the field, which three would you choose, and why?” — This question forces prioritization. The three you choose reveal what you value most: first aid utility? Emotional resonance? Culinary versatility? Ecological fascination?
- “How is your card set different from the course Materia Medica? What did your direct experience add?” — The course provided monographs. You provided observation. What lives on your cards that no textbook could have told you?
Portfolio Assembly Guide
Project Checklist
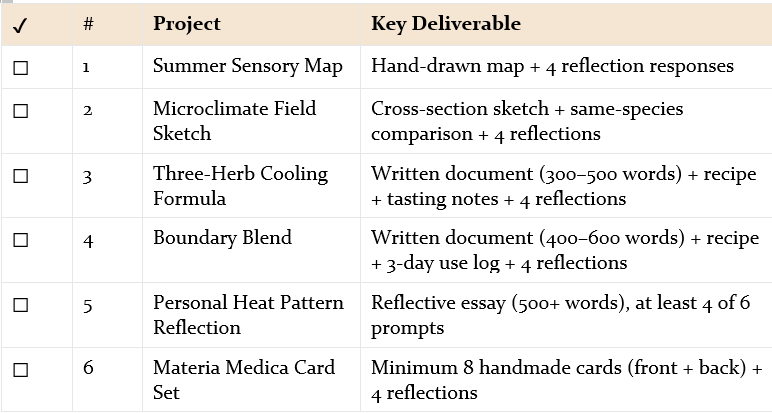
Assembly Options
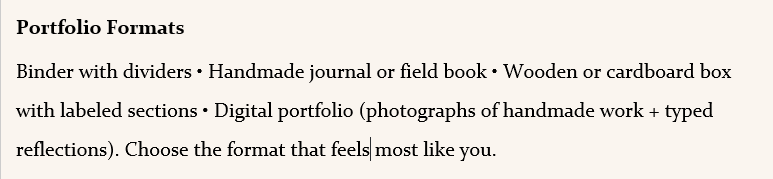
Binder with dividers: Use a three-ring binder with six tab dividers, one for each project. Slide hand-drawn maps and sketches into sheet protectors. This is the most practical option for a portfolio that includes both large-format drawings and written documents.
Handmade journal or field book: Bind or stitch your own journal. Paste in maps, tuck in cards, write reflections directly on the pages. This is the most personal option — the portfolio becomes an artifact in itself.
Wooden or cardboard box with labeled sections: Use a cigar box, a wooden tea chest, or a sturdy cardboard box. Create dividers from card stock. Roll the maps, stack the cards, fold the reflections. This is the most tactile option — opening the box becomes a ritual.
Digital portfolio: Photograph all handmade work at high resolution. Type reflections. Organize in folders or a PDF. This is the most portable option, but be sure to preserve the originals — the photographs are records, not replacements.
Optional Additions
Your portfolio is complete with the six projects above. But if you want to go further, consider including any of the following:
● A cover page with a title, your name, the summer and year, and a personal image or pressed plant
● A “Summer Summary” — one paragraph capturing your overall experience of the course and the season
● Pressed plant specimenstucked into relevant sections (yarrow with Project 4, linden with Project 3, etc.)
● Photographs from field work— the transect, the creek, the monarda stand, the storm rolling in
● A list of “Questions I’m Still Carrying” — the things this course opened but did not close, the curiosities that will follow you into autumn
Self-Assessment
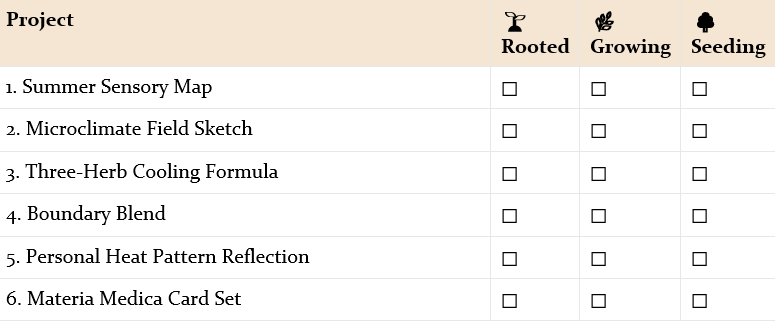
This is not a grading rubric. There are no grades in this course. This is a tool for honest self-reflection — a way of marking not just whether you completed a project but how deeply it changed you. Read the three levels below, then mark your self-assessment for each project in the table that follows.
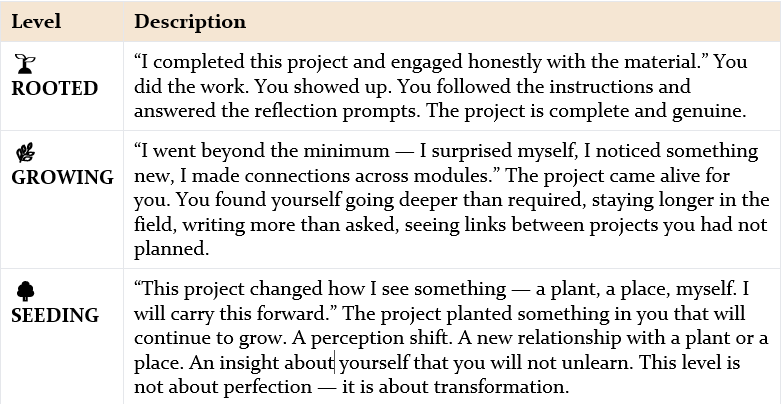
Mark Your Self-Assessment
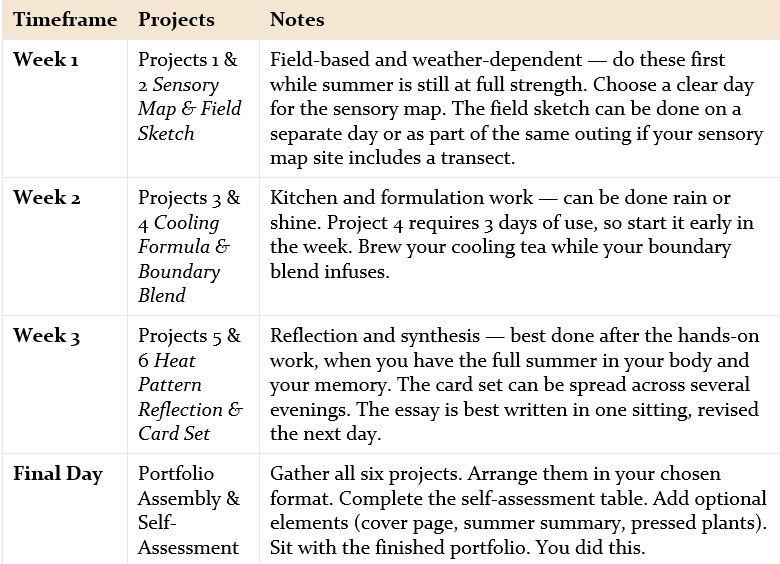
Suggested Pacing Guide
The capstone is designed to be completed over two to three weeks. The suggested sequence moves from external observation to formulation to internal reflection, mirroring the arc of the course itself. However, projects can be completed in any order. Use the weather and your energy as guides — field projects need fair weather, kitchen projects can happen during rain, and reflective writing is often best done in the cool of evening.
Safety and Ethics Reminder
Plant Identification Confidence
Never consume, apply to skin, or prepare a formula with any plant you have not positively identified.Positive identification means you can name the plant, describe its key identifying features, and distinguish it from any look-alikes. If you are uncertain, do not harvest. Consult a field guide, a knowledgeable mentor, or a local botanist. When in doubt, leave it in the ground.
Ethical Harvesting
● Never take more than 10% of a stand — the remaining 90% is for the ecosystem, the pollinators, and the future.
● Never harvest stressed plants — plants in drought, plants that are the only ones of their kind at a site, plants that are flowering or setting seed when the population is small.
● Harvest from abundant, healthy populations. If a plant is scarce, observe it, photograph it, sketch it — but leave it.
● Know the rules: check whether you are on public land, private land with permission, or protected land where harvesting is prohibited.
At-Risk Species
Before harvesting any wild plant, check the United Plant Savers “Species At-Risk” and “To-Watch” lists. These lists identify native medicinal plants whose wild populations are declining due to overharvest, habitat loss, or other pressures. If a plant appears on these lists, do not wild-harvest it. Grow it in your garden, purchase it from a responsible cultivator, or work with a different species.
Skin Sensitivity Testing
For all topical formulations (Project 4 and any after-sun oils or spritzers), perform a patch test before full application. Apply a small amount to the inside of your wrist or elbow. Wait 24 hours. If redness, itching, or irritation develops, do not use the formula on larger areas of skin. Be especially cautious with St. John’s Wort (phototoxic — can cause burns with sun exposure) and citrus essential oils (also phototoxic).
Closing: Dusk on the Last Day
The light has gone copper. Not gold anymore — copper, the color of a penny held up to a kerosene lamp, the color the Ozarks turn when summer begins to hand itself over. The first katydid has started its rasp, a sound like a tiny file on a tiny saw, and somewhere behind it the last cicada is still grinding down, the two sounds overlapping for a few days the way old season and new season always overlap, neither one fully gone, neither one fully arrived.
You are sitting on the porch — or the back step, or the creek bank, or the tailgate of the truck. Your completed portfolio is spread around you. The materia medica cards are fanned on the table, their hand-drawn plants catching the last light. The sensory map is pinned under a jar of sumac lemonade. The cooling tea is half-drunk, the cup still faintly warm, the linden and mint and lemon balm settling into each other the way old friends settle into silence. The boundary blend is on your wrists, cedarwood and wild bergamot, and the scent rises every time you turn a page.
The goldenrod is fully golden now. You noticed the moment it shifted — the moment the buds opened all the way and the plumes went from chartreuse to that deep, defiant yellow that says I am the last bright thing before the turn. You noticed it the way you notice everything now: not as background but as signal, not as scenery but as pattern, not as something happening out there but as something you are in conversation with.
You didn’t just study summer. You apprenticed yourself to it. The hillside remembers you now — your footprints in the creek mud, your crush tests on the monarda, your breath in the hollow where you stood still long enough to feel the temperature drop three degrees. And you remember it — not as information, but as pattern. The way heat moves. The way plants respond. The way your own body mirrors the landscape it walks through.
This is pattern literacy. This is the beginning

Looking Ahead: Autumn Pattern Literacy
You can read the land now. You can read the plants. You can read yourself. In autumn, the patterns shift — the pharmacy changes, the light changes, the emotional ecology deepens. If summer was the disperser, autumn is the gatherer. The volatile oils that blew outward in July turn inward in October — roots thicken, barks tighten, berries concentrate their sugars against the coming cold. The emotional register drops from the bright urgency of summer into something lower, slower, richer: the work of harvest, the work of letting go, the work of storing what matters and releasing what doesn’t.
The plants you’ll meet are different. Roots you ignored all summer become the center of the practice: burdock, dandelion, yellow dock, sassafras. The berries ripen: elderberry, hawthorn, rose hip. The barks reveal themselves when the leaves fall: slippery elm, wild cherry, wahoo. The mushrooms appear — and with them, a whole new kingdom of pattern to learn.
We’ll meet again when the persimmons drop.
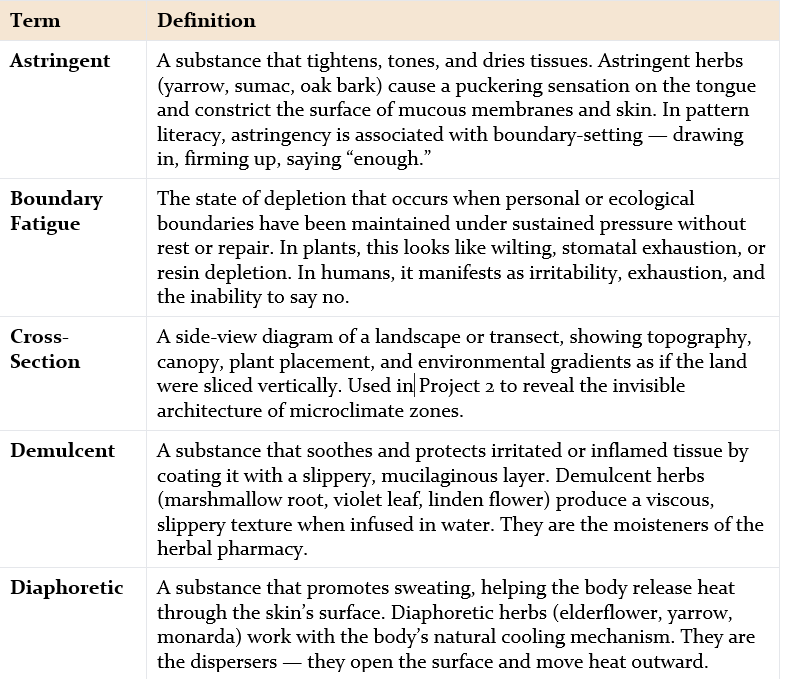
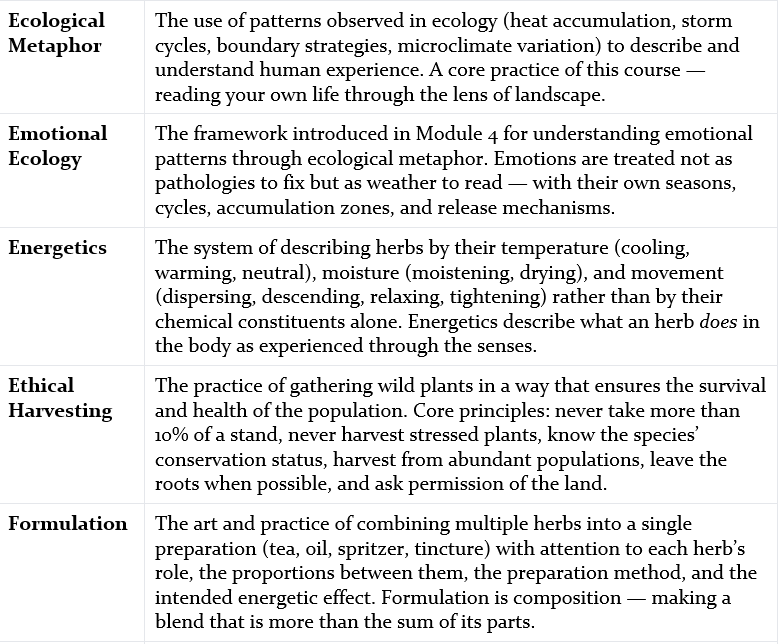
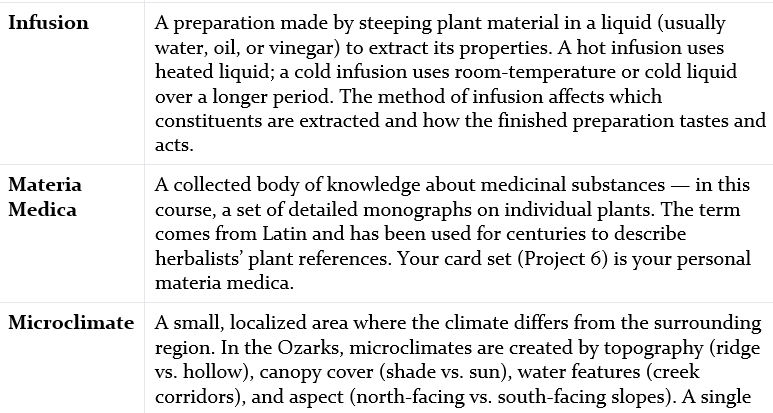
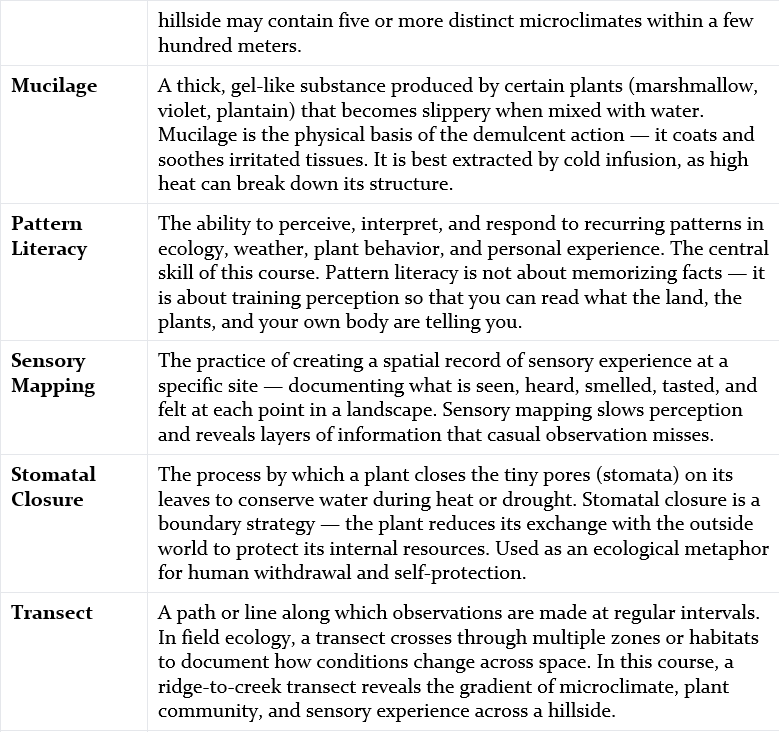
Glossary of Key Terms