Portland Vase
The Portland Vase is a Roman cameo glass vase, which is dated to between AD 1 and AD 25, though low BC dates have some scholarly support.[1] It is the best known piece of Roman cameo glass and has served as an inspiration to many glass and porcelain makers from about the beginning of the 18th century onwards. It is first recorded in Rome in 1600–1601, and since 1810 has been in the British Museum in London. It was bought by the museum in 1945 (GR 1945,0927.1) and is normally on display in Room 70.
The vase measures about 25 centimetres (9.8 in) high and 56 cm (22 in). It is made of violet-blue glass, and surrounded with a single continuous white glass cameo making two distinct scenes, depicting seven human figures, plus a large snake, and two bearded and horned heads below the handles, marking the break between the scenes.
The bottom of the vase was a cameo glass disc, also in blue and white, showing a head, presumed to be of Paris or Priam on the basis of the Phrygian cap it wears. This roundel[citation needed] clearly does not belong to the vase, and has been displayed separately since 1845. It may have been added in antiquity or later, or is the result of a conversion from an original amphora form (paralleled by a similar blue-glass cameo vessel from Pompeii). It was attached to the bottom from at least 1826.
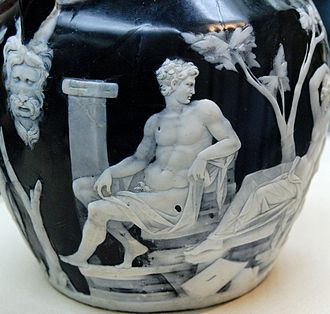
Iconography
The meaning of the images on the vase is unclear, and none of the many theories put forward has been found generally satisfactory. They fall into two main groups: mythological and historical, though a historical interpretation of a myth is also a possibility. Historical interpretations focus on Augustus, his family and his rivals, especially given the quality and expense of the object, and the somewhat remote neo-classicism of the style, which compares with some Imperial gemstone cameos featuring Augustus and his family with divine attributes, such as the Gemma Augustea, the Great Cameo of France and the Blacas Cameo (the last also in the British Museum).
Interpretations of the portrayals have included that of a marine setting (due to the presence of a ketos or sea-snake), and of a marriage theme/context, as the vase may have been a wedding gift. Many scholars (including Charles Towneley) have concluded that the figures do not fit into a single iconographic set.[citation ^needed]
Scene 1...
Rediscovery and Provenance
One story suggests that it was discovered by Fabrizio Lazzaro in what was then thought to be the sarcophagus of the Emperor Alexander Severus (died 235) and his mother, at Monte del Grano near Rome, and excavated some time around 1582.[5]
The first historical reference to the vase is in a letter of 1601 from the French scholar Nicolas Claude Fabri de Peiresc to the painter Peter Paul Rubens, where it is recorded as in the collection of Cardinal Francesco Maria Del Monte in Italy. In 1626 it passed into the **Barberini family collection (which also included sculptures such as the Barberini Faun and Barberini Apollo) where it remained for some two hundred years, being one of the treasures of Maffeo Barberini, later Pope Urban VIII (1623–1644). It was at this point that the Severan connection is first recorded. The vase was known as the "Barberini Vase" in this period.[5]
1778 to Present
Between 1778 and 1780, Sir William Hamilton, British ambassador in Naples, bought the vase from James Byres, a Scottish art dealer, who had acquired it after it was sold by Cornelia Barberini-Colonna, Princess of Palestrina.
She had inherited the vase from the Barberini family. Hamilton brought it to England on his next leave, after the death of his first wife, Catherine. In 1784, with the assistance of his niece, Mary, he arranged a private sale of the vase to Margaret Cavendish-Harley, widow of William Bentinck, 2nd Duke of Portland, and dowager Duchess of Portland.[13] It was sold at auction in 1786 and passed into the possession of the duchess's son, William Cavendish-Bentinck, 3rd Duke of Portland.
The 3rd Duke lent the original vase to Josiah Wedgwood and then to the British Museum for safe-keeping, by which point it was known as the "Portland Vase". It was deposited there permanently by the fourth Duke in 1810, after a friend of his broke its base. It has remained in the British Museum ever since 1810, apart from 1929 to 1932, when the 6th Duke put it up for sale at Christie's (where it failed to reach its reserve). It was finally purchased by the museum from the 7th Duke in 1945 with the aid of a bequest from James Rose Vallentin.
Copies

Replica of Portland Vase, about 1790, Josiah Wedgwood and Sons; V&A Museum no. 2418-1901
The 3rd Duke lent the vase to Josiah Wedgwood, who had already had it described to him by the sculptor John Flaxman as "the finest production of Art that has been brought to England and seems to be the very apex of perfection to which you are endeavoring". Wedgwood devoted four years of painstaking trials at duplicating the vase – not in glass but in black and white jasperware.
He had problems with his copies ranging from cracking and blistering (clearly visible on the example at the Victoria and Albert Museum) to the sprigged reliefs 'lifting' during the firing, and in 1786 he feared that he could never apply the Jasper relief thinly enough to match the glass original's subtlety and delicacy. He finally managed to perfect it in 1790, with the issue of the "first-edition" of copies (with some of this edition, including the V&A one, copying the cameo's delicacy by a combination of undercutting and shading the reliefs in grey), and it marks his last major achievement.
Wedgwood put the first edition on private show between April and May 1790, with that exhibition proving so popular that visitor numbers had to be restricted by only printing 1,900 tickets, before going on show in his public London showrooms.
(One ticket to the private exhibition, illustrated by Samuel Alkin and printed with "Admission to see Mr Wedgwood's copy of The Portland Vase, Greek Street, Soho, between 12 o'clock and 5", was bound into the Wedgwood catalogue on view in the Victoria and Albert Museum's British Galleries.)
As well as the V&A copy (said to have come from the collection of Wedgwood's grandson, the naturalist Charles Darwin,[15] others are held at the Fitzwilliam Museum (this is the copy sent by Wedgwood to Erasmus Darwin which his descendants lent to the Museum in 1963 and later sold to them); the Indianapolis Museum of Art[16] and the Department of Prehistory and Europe at the British Museum.[citation needed] The Auckland War Memorial Museum has a 19th-century jasperware facsimile in their collections,
The vase also inspired a 19th-century competition to duplicate its cameo-work in glass, with Benjamin Richardson offering a £1,000 prize to anyone who could achieve that feat. Taking three years, glass maker Philip Pargeter made a copy and John Northwood engraved it, to win the prize. This copy is in the Corning Museum of Glass in Corning, New York.[17]
The Wedgwood Museum, in Barlaston, near Stoke-on-Trent, contains a display describing the trials of replicating the vase, and several examples of the early experiments are shown.
Vandalism and Reconstruction
[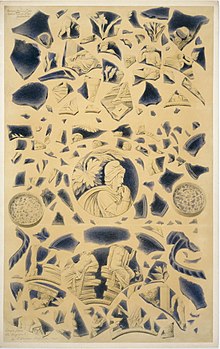
The Portland Vase fragments – watercolour by Thomas H. Shepherd (1845)
At 3:45 p.m. on 7 February 1845, the vase was shattered by William Lloyd,[18][19] who, after drinking all the previous week, threw a nearby sculpture on top of the case, smashing both it and the vase. He was arrested and charged with the crime of willful damage.
When his lawyer pointed out an error in the wording of the act which seemed to limit its application to the destruction of objects worth no more than five pounds, he was convicted instead of the destruction of the glass case in which the vase had sat. He was ordered to pay a fine of three pounds (approximately 350 pounds equivalent in 2017[20]) or spend two months in prison. He remained in prison until an anonymous benefactor paid the fine by mail.[18]
The name William Lloyd is thought to be a pseudonym. Investigators hired by the British Museum concluded that he was actually William Mulcahy, a student who had gone missing from Trinity College. Detectives reported that the Mulcahy family was impoverished. The owner of the vase declined to bring a civil action against William Mulcahy because he did not want his family to suffer for "an act of folly or madness which they could not control".[18]

Detail
The vase was pieced together with fair success in 1845 by British Museum restorer John Doubleday, though he was unable to replace thirty-seven small fragments. It appears they had been put into a box and forgotten. On 5 October 1948, the keeper Bernard Ashmole received them in a box from Mr. G.A. Croker of Putney, who did not know what they were. After Doubleday's death, a fellow restorer from the British Museum took them to Mr. G.H. Gabb, a box maker, who was asked to make a box with thirty seven compartments, one for each fragment. However, the restorer also died and the box was never collected. After Gabb's death, his executrix, Miss Amy Reeves, brought in Croker to value Gabb's effects. This was how Crocker came to bring them to the museum to ask for help in identifying them.[21]
By November 1948, the restoration appeared aged and it was decided to restore the vase again. It was dismantled by conservator J.W.R. Axtell in mid-November 1948. The pieces were examined by D.B. Harden and W.A. Thorpe, who confirmed that the circular glass base removed in 1845 was not original. Axtell then carried out a reconstruction, completed by 2 February 1949, in which he was only successful in replacing three of the 37 loose fragments.[22] He reportedly used "new adhesives" for this restoration, which some thought might be epoxy resins or shellac, but were later discovered to simply be the same type of animal glue that Doubleday used in 1845. He also filled some areas with wax. No documentation of his work was produced.
...
Research Notes:
"After a long list of Barberini’s James Byres was the next person to come into possession of the Vase, strictly as a dealer. He was a Scot whose father Patrick had fled, with his son aged eleven, to Rome after being on the loosing side at the battle of Culloden in 1745, as did the man he was fighting for at the time, Bonny Prince Charlie. In Rome, after failing to become an artist, James went into an unsuccessful career as an architect. He did do better hiring himself out as a guide for the young British aristocrats taking ‘The Grand Tour.’
He also had a side-line as a dealer in antiquities, which proved to be more successful than anything he had previously been involved in. So when the Princess of Palestrina, Donna Cornelia Barberini Colonna could not pay her gambling debts, it was to Byres that she turned. Donna Cornelia was a descendant of the Barberini, guardian of the heir to the dwindling family fortune, a boy who had not yet come of age and was in no position to prevent the Princess from squandering his inheritance. Unfortunately her weakness for card playing had exacerbated the financial crisis in the once proud family. Being a Princess she had no desire to part with her jewels or gowns, but she could sell the Vase. In 1780 she sold it to Byres for around £500, ending a 153 years of ownership by the Barberini family."
Some of this reflects things that you had told me. What's new to me is the tie to Bonny Prince Charlie...which explains how Byers got to be in Roma after all. The article includes additional tidbits, some interesting and twisty. I hope this is found to be useful.
Start on Page 45 of the attached pdf.
The Elgin Marbles & the Portland Vase s & the Portland Vase s & the Portland Vase s & the Portland Vase
Charles Easthope Charles Easthope Charles Easthope Charles Easthope
When I knew we were to visit the British Museum as part of the spring meeting in London I had two very special items on my ‘must see’ list; the Elgin Marbles and the Portland Vase. This being my first visit I had little idea of the size of the building, or the number of exhibits that were available to view. Being severely restricted for time, as we were, I ended up replicating our ‘Show & Tell’ substitute of the afternoon meeting, i.e. I saw one and missed the other one.
I was sorry not to have seen the Vase, but the Marbles were far more than I had heard about, or expected to see; quite breathtaking, and so many of them. Walking round I came across two females and a male companion in the act of taking a photograph. The ladies were looking at the male photographer with arms outstretched behind them in the direction of one of the wall mounted marbles, with palms open, not pointing. I was curious so with the shot ‘in the can’ I asked what was going on. I received quite an aggressive reply from one of the ladies, “we are pointing at the stolen marbles.” After a pause she said, quite superfluously, “We are Greek.”
Over the next few days I was able to learn from the Web that this is a very emotive subject, with fierce argument on both sides as to whether the marbles should stay in the British Museum, or be returned to Greece. (I belong to the ‘stay in the B.M.’ camp.) The arguments on both sides seem to concentrate on claims that the opposing side will not look after them ‘as well as we can,’ and cite damage that each side has supposed to have inflicted on the marbles. The British ‘crime’ appears to be that at some stage we ‘washed the marbles.’ (Apparently this was done in order to remove traces of un-flaked paint that remained from the original and made the marbles look unsightly.) I was unable to find confirmation, either on the Web or anywhere else, of a far more serious and unforgivable damage done by the British, which my art teacher told me about some years ago.
It seems that in order to spare the blushes of the Victorian lady visitors to the Marbles all the male parts of men and Horses were chipped off. If true this is outrageous, when all that needed to be done was attach a ‘fig leaf’ that could have been removed without damage when we had moved on to a more enlightened age. In the interests of ‘research’ I took on the onerous task of checking every one, and sure enough there wasn’t a nude male, or horse, that had not had that part of his anatomy either fully, or partly removed. (I would think that the ‘partly removed’ would be more offensive to any squeamish Victorian than doing nothing at all?) I have been back to my art teacher recently to try and establish his source, but he could not remember, saying only that he “read it in a book.” I would like to hear from any reader who can throw more light of this subject.
……………………….
As yet the exact date and origin of the Portland Vase has not been firmly established, and scholarly research is still ongoing. It is accepted however that it is around 2,000 years old, possibly being made in the reign of the first Roman emperor Augustus. (27 BC – 14AD.) It hasn’t been called by this name for all that time of course. The sequence of events that were eventually to lead to it being so named, were set in motion by what became known in Britain as ‘The Glorious Revolution of 1688.’
The Vase, in its present version, is quite small, only nine and three quarters inches high, and seven inches across at the widest point. It is made of blue/black glass, and scratches around the inside of the top suggest that it was once probably fitted with a lid that is now lost. The body has a decorative frieze of figures that have been carved from white glass in base relief, set in a landscape of trees and rocks. Two handles of blue glass connect the neck with the shoulders of the Vase. There is a separate base disk, also of white decoration on blue glass. This measure’s four and three quarters inches in diameter, and is of Roman origin. Again modern scholarly research, which includes chemical analysis, has proved that the composition of the base disk does not match that of the Vase. The same means have established, and been accepted by most scholars, that the Vase was in fact designed originally as an amphora with a pointed base, and at some time in antiquity, possibly as a result of being damaged, it has been cut down to its present size.
UK Belleek Collectors’ Group Newsletter 34/2 July 2013
Page Page Page Page 42 4422 42
There are seven figures, divided into two scenes by the handles. On side one is a young man with a cloak hanging from his hand, (A); a young woman seated, with a sea serpent, between her thighs, who reaches behind her to clasp the young man’s outstretched arm, (C); a cupid flies above them with a bow and torch, (B), and finally for this side, a bearded man standing looking on, with his hand to his chin, (D). On side two is a young man, (E); a young woman, with a torch upended in her fingers, (F) and a young woman holding a long staff, (G). These three figures are sitting, or in the case of (F), reclining, on ‘Flagstone rocks’ reminiscent of the Belleek flagstones, (sadly only visible now as the base for several Parian figures made at the Pottery, due to the act of vandalism that destroyed the ‘Flagstone Falls’ at Belleek during the construction of the Power Station in Ballyshanon.) At the feet of figure (F) is a smaller flag-like stone with a slit in it, rather like the front of an ancient post box. This is believed to be a form of signature, and plays a significant role in dating the creation of the Vase.
So what do these figures represent? Because no doubt they do represent something, and were not just placed there at random. After two thousand years it is not possible to know, although this has not stopped numerous learned scholars from propounding innumerable theories on the subject. For the four hundred years of its known history the Vase has been the subject of endless speculation, not only as to the date and origin, but also to the meaning and identification of the figures around the body, right up to the present century, with the current tally of known interpretations exceeding fifty. Some of the theories have led the reader to believe that the experts are writing about the Vase without even seeing it. The cupid, (B) is the only figure who possesses easily identifiable attributes, the rest are open to wildly varying interpretations. Some experts have been content to ‘identify’ as little as two figures, with no mention of the other five. Some have identified male figures as female, and female as male. Classical names that occur, and re-occur, include Leda, Jupiter, Venus, and Eurydice, Pollux & Castor and Apollo, with abstract attributes such as Love, Loss, Sorrow, and Sloth. These
UK Belleek Collectors’ Group Newsletter 34/2 July 2013
Page Page Page Page 43 4433 43
theories have been accompanied with a fascinating account of the mythology, and relation between this and the figures represented on the Vase. There is also an element of some experts appearing to develop a theory on the flimsiest of grounds, and sticking rigidly to it, despite any contradictory evidence. The truth as I see it is that it doesn’t matter; it is most unlikely that we will ever be sure of what the original intention was, but that in no way prevents us from admiring the beauty of both the figures and the workmanship that went into creating them.
I want to concentrate here though on the Vase as we know it, the places it has been, and the many people it has met who have handled it during its long and eventful journey that culminated in its permanent home in the British Museum.
The discovery of the Vase is equally shrouded in mystery; According to Pietro Santi Bartoli, a seventeenthcentury antiquarian, writing in 1697, the Vase was first discovered by a man called Fabrizio Lazzaro in 1582, when digging in a mound of land he owned on the outskirts of Rome. This mound, which was around fifty metres in diameter, was known as Monte del Grano, due to its resemblance to a cone-shaped mound, (or mountain) of grain. A passage on the ground level leading to a large, by then, empty chamber, proved the Monte de Grano to be a burial mound from the days of Imperial Rome. Lazzaro believed that above the empty tomb was hidden another secret chamber, and was hoping to add to his already substantial collection of antiques. When his digging revealed this second chamber, he found a good quality sarcophagus that appears to be undisturbed, decorated with reliefs that show scenes from the life of Achilles, with two reclining figures on the lid. Lazzaro was possibly hoping to find treasures of gems or gold when he opened the sarcophagus; what he found was the Vase, an even greater treasure. Bartoli claimed that the Vase contained the ashes of Emperor Alexander Severus who came to power in Rome in 222 AD, and identified the two figures on the lid of the sarcophagus as those of the Emperor and his mother Julia Mammaea.
This view was generally accepted from Bartoli’s time up to the beginning of the twentieth-century; that is until an Englishman, Henry Stuart-Jones, the former director of the British School at Rome, presented a paper to his old School in January 1909, which gave a vigorous rebuttal of the Vases association with the sarcophagus He had examined the evidence as presented by Bartoli, and tracked down a memorandum relating to a meeting of the Communal Council on 4th May 1582, which had discussed whether or not to acquire the sarcophagus from the Monte del Grano. Another memo proved that by 1590 the sarcophagus was placed in the municipal collection. While this firmly establishes the discovery of the sarcophagus to the end of the sixteenth-century, there was no mention of the Vase. Stuart-Jones was not finished, he had discovered another account of Lazzaro’s excavation, this time by a contemporary, Flaminio Vacca, who wrote in 1594, just six years after the opening of the tomb. Again there is no mention of the Vase, all Vacca says is that a sarcophagus was discovered and in it were some ashes. If the Vase was in fact there, ashes or no ashes, how could anyone fail to mention it? This was thought sufficient to disprove Bartoli’s story, but Stuart-Jones could provide no alternative answer to the discovery of the Vase, and significantly, up to the present day, no one else has been able to offer a plausible explanation either. In view of the turbulent history of Rome in the early centuries of Christianity, the Vase would have needed to be securely hidden to have escaped unscathed, and this would mean being underground, and underground would more than likely mean deliberately buried in a tomb. It has recently been suggested that Bartoli’s version of the discovery may not have been so wide of the mark after all, and that Lazzaro secretly sold the small portable part of his find, the Vase, to his Roman neighbour, Cardinal del Monte. A Council ruling was issued in 1579 that was intended to protect ancient monuments, and prevent unscrupulous landowners and excavators from taking unfair advantage of their finds. This would have meant that if Lazzaro had sold the Vase, he and the buyer would both have needed to keep the transaction a secret.
The Vase’s connection with Alexander Severus was first mentioned by a scholar named Girolamo Teti, who wrote a description of it in 1642, some time before Bartoli wrote of its discovery. He was convinced that the figures on the Vase referred to the story of Alexander. Teti had a theory of his own, the first of many, which goes thus: On side one, (A) is Alexander the Great, assisting in the birth of Alexander Severus. (B) is Cupid. (C) is Mammaea, Alexander Severus’s mother. Mammaea gave birth to her son in a temple dedicated to Alexander the Great, and on the night of the birth she dreamt of a purple serpent, foretelling his imperial
UK Belleek Collectors’ Group Newsletter 34/2 July 2013
Page 44
destiny; there is the serpent with her. (D) is Old Father Time. On side two (E) is Youth, symbolising the shortness of Alexander’s reign. (F) is Death, symbolising his death. Finally, (G) is an elderly man, symbolising the decrepit Roman Empire itself. If you look more closely than maybe Teti did, you will notice that (G), ‘the elderly man’ is in fact a young woman.
The only thing we know with any certainty, the first recorded fact, is that at the end of the sixteenth-century the Vase came into the collection of Cardinal Francesco Maria del Monte, whether it was in fact purchased from Lazzaro or not, is not so certain. Those who play the major part in the story of the Vase divide roughly into three groups: ‘the rich and powerful’ who owned the Vase out of a love of beautiful objects, the ‘dealers’ who obtained it purely for the purpose of selling it for a profit, and ‘the learned scholars’ who studied it simply as a pursuit of knowledge. In the limited knowledge we have of Cardinal del Monte’s ownership of the Vase, we encounter all three groups.
Del Monte was born in Venice in the middle of the sixteenth century, his father was in the service of the princely Della Rovere family, and he grew up at the court of Urbino. In his early twenties he moved to Rome and here became a close friend and adviser to Cardinal Ferdinando de Medici, a member of the ruling family of Florence, where he soon became indispensable to his powerful patron. Things took a dramatic turn when Ferndinando’s elder brother, the Grand Duke and his wife both died suddenly, apparently of poison. Ferndinando had to rush back to Florence to assume the title and he took del Monte with him. So Francesco’s fortune was made; through the influence of the new Grand Duke he soon became a Cardinal himself and took up residence in a Medici palace – the Palazzo Madame – and he began to gather around him beautiful things of every description. ‘The rich and powerful owner.’
We only know the Vase belonged to del Monte because of the writings of a Frenchman, Nicolas-Claude Fabri de Peirese, (1580-1637) regarded by many as the first real antiquarian. De Peirese was a scientist, historian, collector and obsessive letter-writer who corresponded with nearly all the great minds of Europe, as if holding together by his letter-writing the entire intellectual community. He was one of the first to value ancient artefacts because they threw light on the world from which they came. Antiquities like the Vase were not just curiosities or ornaments to him; they were vital pieces of evidence. He had an insatiable curiosity for all things ancient which led him, amongst other things, to carry selected coins around with him in order to compare them with the statures in Rome and elsewhere, and to have copies made of every ancient inscription.
It was this curiosity that brought de Peirese to the Palazzo Madams, where he saw and examined the Vase in 1600/1601, this being the first recorded sighting of the Vase. Soon after he acquired a cast of it in lead, which he afterwards passed onto the painter Rubens. (This may well have been the first copy made of the Vase; there would be many more.) We have Members of the U.K. Belleek Collector’s Research Team that are arguably as keen and dedicated as de Peirese was, and it is acceptable today, but in his day things were far from the case, as he himself made clear:
“Many people loudly scorn our studies, saying that they bring no glory to those who pursue them and no usefulness to others. The only ones who deserve such reproach are those who seek scholarship of a meretricious sort, or even worse, content themselves with collecting antiquities to adorn their cupboards and decorate their houses, only desiring them in order to be seen to possess them. On the other hand there are those who are entirely praiseworthy - they research the antiquities, study them and publish them in order to throw light on the works of the classical historians, to illustrate the unfolding history, the better to impress upon the minds of men its personalities and their deeds, and great events.” In spite of the reference to publishing, de Peirese never published anything. We only know of his writings from his letters and from his biographer Gassendi. De Peirese, one of the most ‘learned of the scholar’s.’
Cardinal Francesco Del Monti suffered a long final illness affording him ample time to decide where he might bestow his choice possessions. He had no direct heirs, but plenty of family members. He willed the Vase out of the family, but by the time he died they had made sure it was safely back in their hands. That these grieving relatives were not prompted by any deep-seated love of antiquities is demonstrated by the fact that, almost immediately, they sold the Vase on, for six hundred scudi. ‘The dealer, (or in this case dealers,) selling it for a profit.’
UK Belleek Collectors’ Group Newsletter 34/2 July 2013
Page Page Page Page 45 4455 45
So in 1627, after the death of del Monte, the Vase made a short journey from the Palazzo Madama, the home of its first known owner, to the Palazzo Barberini, the home of its second known owner, Cardinal Maffeo Barberini. It was to stay in the Barberini family until 1780, and be known as the ‘Barberini Vase’ for longer than that.
Cardinal Maffeo Barberini became Pope Urban VIII, and has the distinction of being the first Pope to be elected by secret ballot. Previously Popes had been elected by ‘Acclamation;’ an influential Cardinal would introduce his candidate to the conclave simply by saying, “I choose him,” and everyone would cheer, or boo. The candidate who inspired the loudest cheers was elected. This ‘Opportunity Knocks clapperboard’ way of choosing the winner was obviously open to abuse. Urban VIII predecessor was Gregory XV, who in his very short reign was not happy with this system, and thought the election of the leader of the Roman Catholic Church deserved better. He therefore decreed that his successor would be chosen by secret ballot, and promptly died, throwing the Vatican into utter confusion. The conclave began on 19th July 1623 in a heat wave, Rome not the place to be at such a time. The two main contenders were evenly matched, resulting in stale-mate. Malaria was rife and by 3rd August ten of the Cardinals had gone down with it. Over the summer eight cardinals and forty of their followers were to die of the disease. To break the deadlock Maffeo Barberini, at the relatively young age of fifty-six, was elected as a compromise candidate.
Maffeo, in order to assert his new status in the eyes of the world, set about establishing the standing of his family by any means at his disposal. He had an elder brother who had three sons; his brother and two nephews were made Cardinals, while the third nephew, Taddeo, reserved for greater honour, was to establish a dynasty. Maffeo began to pour money into his nephew’s pockets from the considerable income derived from the Papal States, pushing nepotism, according to his contemporaries, just about as far as it could go. The distinguished historian Leopold von Ranke estimated that during his twenty year rule as Pope his family amassed 105 million scudi.
It was during Maffeo’s ownership of the Vase that it made its first appearance in a Museum, without leaving the Palazzo Barberini to do so. When Maffeo’s nephew Francesco Barberini was made a cardinal, Cassiano dal Pozzo, a correspondent of the above de Peirese, was given a position in his household. He travelled on diplomatic missions with Francesco to Paris and Madrid. This allowed Francesco to indulge his growing passion for the arts and cemented his regard for dal Pozzo’s learning and cultivation. Dal Pozzo’s first love was science, and he was a member, with his close friend, Galileo Galilei, (of telescope fame) of the Accademia dei Lincei, the ancestor of all scientific societies. When Galileo fell dramatically out of favour with his former friend Pope Urban VIII, following the publication of his Dialogue Concerning the two Chief World Systems in 1629, dal Pozzo opted for a safer field of study – that of antiquities. He still tackled his subject with the same rigorous systematic approach that he applied at the Academy of the Lynxes, determined to make a record of every surviving trace of Ancient Rome that he could find. He bought existing drawings and commissioned artists to make new records of antiquities wherever they could be found in the city.
He collated these drawings into a vast work of twenty-three volumes, arranged by subject matter. He called it Museum Characeum – his Paper Museum. Volume IV contained Statues, utensils and vases, with the Vase taking pride of place in this section. Six drawings of the Vase were included in the Paper Museum, some of which, like the Vase itself, are now preserved in the British Museum, and some of them are in the Royal Library at Windsor. In publishing his Paper Museum dal Pozzo ‘stole a march’ on de Peirese,who had intended to do something similar, again with the Vase taking centre stage, with his friend Rubens providing the illustrations, this enterprise now did not come to fruition.
The longer Maffeo Barberini’s reign as Pope Urban VIII continued, the more unpopular he and his family became. Apart from his outrageous nepotism he had alienated his flock by raising more and more taxes to shore up the finances of the Church, including a tax on corn, which was particularly resented; he also embarked on a disastrous war against the Farness family, which he lost. When news of his death was announced in 1644 a happy populace cheerfully pulled down his statues. (Maybe it is no coincidence that there has not been a Pope Urban since.) In the ensuing conclave the successful candidate was Giambattista Pamphili who became Pope Innocent X. He was known for his opposition to Maffeo’s nepotism and the disastrous war, and took immediate steps to arraign the remaining Barberini’s. Most of the family fled to Paris, leaving the Vase in the care of
UK Belleek Collectors’ Group Newsletter 34/2 July 2013
Page Page Page Page 46 4466 46
Taddeo’s wife Anne, who alone stayed behind in Rome to defend what family treasures she could prevent from being confiscated by Innocent. In Paris the three nephews, Francesco, Taddeo and Antonio sought the protection of Marzarin, the all powerful chief minister, who eventually forced Innocent to accept the return of the surviving Barberini family. The dynasty, fortune and status were restored, and they still had the Vase. But over the next few decades, without Maffeo to channel millions of scudi into the coffers they slipped into decline.
After a long list of Barberini’s James Byres was the next person to come into possession of the Vase, strictly as a dealer. He was a Scot whose father Patrick had fled, with his son aged eleven, to Rome after being on the loosing side at the battle of Culloden in 1745, as did the man he was fighting for at the time, Bonny Prince Charlie. In Rome, after failing to become an artist, James went into an unsuccessful career as an architect. He did do better hiring himself out as a guide for the young British aristocrats taking ‘The Grand Tour.’ He also had a side-line as a dealer in antiquities, which proved to be more successful than anything he had previously been involved in. So when the Princess of Palestrina, Donna Cornelia Barberini Colonna could not pay her gambling debts, it was to Byres that she turned. Donna Cornelia was a descendant of the Barberini, guardian of the heir to the dwindling family fortune, a boy who had not yet come of age and was in no position to prevent the Princess from squandering his inheritance. Unfortunately her weakness for card playing had exacerbated the financial crisis in the once proud family. Being a Princess she had no desire to part with her jewels or gowns, but she could sell the Vase. In 1780 she sold it to Byres for around £500, ending a 153 years of ownership by the Barberini family.
Before Byres sold the Vase he asked his engraver friend Giovanni Pichler to make a mould from it in plaster of Paris, which was done and divided into four sections. Byres could then commission copies from the mould and for this he went to James Tassie.
Now we are getting close to familiar ground; Tassie of course is someone we know from his involvement with Josiah Wedgwood. Born in Glasgow he was originally a stonemason, but had an ambition to become an artist. Acquiring a knowledge of drawing while continuing his trade as a mason he discovered he had a talent for it. Going to Dublin in search of work he met and became an assistant to Dr. Henry Quin, who amused his leisure hours in endeavouring to imitate the precious stones in coloured pastes and in taking accurate impressions of the engravings that were on them. From him Tassie learnt this hobby, turning it into a profitable business for himself. In 1766 he moved to London, and after conquering innumerable difficulties, established a great reputation for fine and perfect work; his cameos and intaglios cast in coloured pastes, white enamel, and sulphur, being eagerly sought by artists and collectors.
But Tassie’s most original work was his portraits in wax, which he afterwards moulded and cast in paste. Many of the eminent personages of his time sat for him, and of these portraits a considerable number were copied by Wedgwood. One of these sitters, Thomas Walker of Manchester, described Tassie’s method of working saying: “He takes three sittings, the first two about an hour, the third not half an hour. He can take two sittings in one day, if he has some hours betwixt to work at it by himself. Between the hours of 12 and 4 he is occupied in attending his shop. During the sitting you may be occupied at almost what you will – eating, - writing, etc., as he only needs a few minutes sitting at finishing particular parts.” Tassie set up his shop in Great Newport Street, not far from Josiah Wedgwood’s showroom. While it is not clear how far their personable relationship went, there is an invoice for sulphur and enamel impressions dated November 11th 1769, showing that Wedgwood was purchasing from Tassie for some considerable time. Tassie also bought moulds from Wedgwood, who had a great respect for his rival, saying of him, (when some suspected Tassie to be the thief of the Jasper Ware formula,) “he is an honourable man, whom it is a credit to emulate,” adding, “Although his seals are not as good as mine.” Tassie issued two Catalogues, a small edition in 1775, and a larger one in 1791. This was called; A Catalogue of Impressions in sulphur of Antiques and Modern Gems from which Pasts are made and sold, by J. Tassie, Compton St, 2nd Door from Greek St, Soho. The contents of this larger, two volume Catalogue did justice to its impressive title, containing three thousand different entries under many headings. Catherine the Great of Russia, who was an obsessive collector of gems, placed an order for the entire collection.
UK Belleek Collectors’ Group Newsletter 34/2 July 2013
Page Page Page Page 47 4477 47
Byres gave Pichler’s mould to Tassie in about 1783, with the permission to make sixty copies, planning on selling them for ten guineas each. After that the mould was to be broken to preserve its rarity; (shades of the Belleek Convention Plate moulds.) The procedure for creating a copy was very slow and by the time Tassie died the limit of sixty had not been reached. Over half a century later in 1845 William Tassie, who had inherited his uncle’s stock was still advertising the remaining number of copies of the Vase for sale. Of the seven copies that survive today one is in the British Museum, they do not reproduce the contrasting colours of the original. They do however show what the Vase looked like in the eighteenth century, before it was smashed in 1845, (see below.) They all faithfully reproduce, on the otherwise pristine Vase, a crack, semicircular in shape, about eight inches long that curves up from the base of the Vase and down again, running through Figures C, D, and E. This is the only evidence that this crack existed because it was subsequently disguised by the later damage.
Byers sold the Vase not long after Pichler’s mould was successfully produced, and the man he sold it to was a collector, not in the ‘Rich and powerful’ category though, because his funds struggled to keep pace with his obsessive need to surround himself with beautiful things. He was also, like Byers, an antiquarian whose main obsession happened to be vases. This man was Sir William Hamilton.
William Hamilton was born to a Lady of the Bedchamber, who was almost certainly mistress to Fredrick, Prince of Wales. This meant that he was brought up at court, and was, if nothing more, at least a sort of foster-brother to Frederick’s son George, the future King George III. In spite of his ‘Royal’ connections, being a younger son, he had to make his own way in the world. Not being very successful at this he married an heiress, Catherine Barlow, and surprisingly, given the pecuniary motive, the marriage seems to have been a genuinely loving one. Hamilton’s old playmate was crowned King in 1760 and Hamilton was his equerry. He began collecting pictures but spent more than he could afford, and ended up selling two collections. Catherine became ill, and this was not helped by the very severe winter of 1762. So when an opportunity presented itself, in the shape of a vacant post of Envoy to the Kingdom of the Two Sicily’s in 1763, to move to a warmer climate, Hamilton applied for it, and was given the post. He and Catherine moved to Naples in 1764, where his passion for collecting was given free reign.
William Hamilton
This was the time when the earth around Naples was giving up the most spectacular secrets; Pompeii and Herculaneum, buried in 79 AD by the eruption of Vesuvius, were being excavated for the first time, providing amongst their many treasures, vital evidence that would assist in the dating of the Vase. The area around Naples had been settled by the Ancient Greek colonists before the Romans came along, and their tombs were being opened and ransacked too. From these tombs came vases whose decoration preserved the artistry of the Ancient Greeks, some of them made in Athens and Corinth in the fifth century BC, during the heyday of those cities. These vases provided glorious examples of an ancient artistry which survived in no other form. Hamilton became obsessed with them, buying from tomb-robbers and dealers, even going in for a little tomb-robbing himself.
Of the few surviving pieces of cameo glass from this time, two in particular bear comparison with the Portland Vase, and both were discovered during the excavation of Pompeii. Of these one is the Auldjo Jug, which is also in the possession of The British Museum. The other is known as The Blue Vase, now kept in the Museo
UK Belleek Collectors’ Group Newsletter 34/2 July 2013
Page Page Page Page 48 4488 48
Nazinale Napoli; both are cameo work in blue and white glass. There is one striking point of similarity with the Portland Vase. At the base of one of the scenes of The Blue Vase is a square object that looks like the front of an ancient post box. It is the same as the object depicted on the Portland Vase at the feet of figure (F). It has been suggested that this is a signature, indicating that the Portland Vase, the Blue Vase and the Auldjo Jug all came from the same workshop, and with two of them documented as coming from the ruins of Pompeii, making all three prior to AD 79.
Before long Hamilton had amassed a collection of several hundred ancient vases; he was quick to realise the importance of his collection, and arranged to have it catalogued. The first volume came out in 1767, just three years after arriving in Naples, it was called: ‘Collection of Etruscan, Greek and Roman Antiquities from the Cabinet of the Honble Wm. Hamilton His Britannick Majesty’s Envoy Extraordinary at the Court of Naples.’Josiah Wedgwood, in the process of opening his new factory in the Potteries, (which of course he was to call Etruria,) began to produce copies of Hamilton’s vases from the prints in the first volume. It was the beginning of a relationship between Wedgwood and Hamilton that would be highly significant the life of the Vase.
The Hamilton’s returned to England in 1771 on leave, and Hamilton brought his vases with him. He needed to sell them in order to recoup the money spent on their acquisition and the elaborate publication. He wanted the vases to go to the Nation and so they went to the British Museum. Parliament voted more than eight thousand pounds to Hamilton in payment for them. The whole country was now mad for vases, not only was the collection receiving rave viewing at the British Museum, but homes were being decorated with vases like never before.
Hamilton visited Rome in 1782, where he met James Byers and saw the Vase for the first time. He was later to tell Wedgwood in a subsequent letter, “I asked ‘will you sell it,’ he answered, ‘yes but never under a £1,000.’ ‘I will give you a £1,000,’ and the business was concluded in a moment;” although he wasn’t sure just how he was going to pay for it at the time, and in fact bought it on ‘hire purchase,’ giving Byers a bond for the money to be paid provided he sold it on; if not it was to be returned. In August, little more than a month after acquiring the Vase, Hamilton’s wife Catherine died. He decided to go home on leave, determined to sell the Vase. He travelled home by land, but not wishing to subject the Vase to the hazardous roads it would be compelled to traverse, he sent it by sea. So in all probability the Vase left Italy for the first time, never to return again, and landed in the Port of London in the summer of 1783.
Desperate to find a buyer for the Vase Hamilton took every opportunity to show it off in London Society, which included proudly giving a presentation to the ‘Society of Antiquities.’ Fortunately for his purpose, the ‘dream-buyer’ almost fell into his lap. Now a widow, his only relative in London was his dead brother Charles daughter Mary, and she just happened to friendly with the Duchess of Portland.
Strictly speaking she was the Dowager Duchess, her husband having died in 1761 at the early age of 54. She was Margaret Cavendish Holles-Harley before marriage, daughter of the Earl of Oxford, and on the death of her parents inherited the family fortune, including Welbeck Abby. So she was already an heiress when she married the rich William Bentinck, Second Duke of Portland in July 1734 and the union of their fortunes made them colossally wealthy.
Margaret Cavendish
Hamilton well knew that the Duchess had a mania for collecting and would go to any lengths to add a desirable piece to her already vast collection in her private ‘Museum.’ So began a ‘cat & mouse’ game between Hamilton and the Duchess, conducted through intermediaries in strict secrecy, the Duke using his niece Mary, and the Duchess her friend Mrs. Delany, widow of Jonathan Swift’s long time friend Dr.
UK Belleek Collectors’ Group Newsletter 34/2 July 2013
Page Page Page Page 49 4499 49
Patrick Delany, but who was also known in her own right for her published autobiography and letters, as well as her Shell Work and Cut Paper Flower Collages, some of which are also in the British Museum. Since becoming a widow Mary Delany had been living with her fellow widow, the Duchess. This pantomime went on for some time, the two principals meeting and visiting each other, while avoiding any mention of the sale, leaving that to the intermediaries, until Hamilton sent a veiled message with his niece that he could get £2,000 from the Empress of Russia, but would rather the Vase stay in England. The Duchess well knew that Catherine was more than able to pay the price, so the game was brought to an end. The two met to discuss the deal, and Hamilton settled for £1,800, a profit of £800, minus any interest he had to pay Byers for the bond he had entered into. So, in February 1784 the Barberini Vase became the Portland Vase, although it has never truly lost the name and is still occasionally referred to as the Barberini today.
When the protestant Prince of Orange landed in Torbay on the 5th November 1688, at the invitation of the seven chief conspirators in the plot to replace the Catholic James II, (Shrewsbury, Devonshire, Danby, Lumley, Compton, Russell, and Sydney,) standing beside him was William Bentinck, his childhood playmate. Bentinck had been his constant companion and advisor ever since childhood days, at one stage nursing him through a serious bout of smallpox at great risk to himself. Bentinck was one of the two advisors the Prince deliberated with for several days upon receiving the letter of invitation, before accepting it. (The other one was Van Dykvelt.) According to some writers the relationship between the Prince and Bentinck was even closer, they were lovers. Having accepted the Crown one of the first things William III did was to give William Bentinck the great office of Groom of the Stole with a salary of £5,000 a year.
William III Half Guinea from 1697
When William & Mary were crowned on April 11th 1689, as part of the Coronation honours Bentinck was made Earl of Portland, the Earldom having become extinct only the year before in 1688. (John Churchill was made Earl of Marlborough in the same honours list.) When Bentinck died his son, also William became the Earl and was made Duke by George I. So it is that his son, another William, became the Second Duke, husband to Margaret, Duchess of Portland, the new owner of the Vase.
The secrecy the Duchess employed during the purchase of the Vase was continued in the ownership of it; the Vase disappeared. It is thought that this was because the Duchess did not want her family to know that she was still spending huge amounts of money on her collection. Whatever the reason, no one, including her family, knew where the Vase had gone. Unfortunately the Duchess did not have long to admire her new acquisition as she died barely a year after acquiring it.
In her will the Duchess left the contents of her Museum to her younger son, with a suggestion that the collection could be sold to compensate for the fact that the bulk of her vast estate would go to the elder son, the Third Duke of Portland. Her treasures were put up for auction by Skinner and Company, Aldersgate Street the
UK Belleek Collectors’ Group Newsletter 34/2 July 2013
Page Page Page Page 50 5500 50
year after her death in more than four thousand lots, the Vase being lot number 4144. The sale lasted for six weeks, and the Vase was sold to a ‘Mr. Tomlinson’ for £1,026, making up nearly one tenth of the overall proceeds of the auction. It was common knowledge that Mr. Tomlinson was an agent, but it wasn’t until a few weeks later that the Gentleman’s Magazine was able to reveal that the buyer was in fact the Duke of Portland; deciding to keep it in the family, he had in effect bought the Vase from his brother. There is a story, not proven, that Josiah Wedgwood was a rival bidder for the Vase. He certainly had the resources to compete in the auction room, and an obsession with the Vase that went far beyond the Dukes. The story goes that the Duke only prevented Wedgwood bidding against him by agreeing to lend the Vase to Wedgwood for a year after the sale, and this is what happened.
William Henry Cavendish Bentinck, Third Duke of Portland had married another Cavendish, Dorothy, sister to the Fifth Duke of Devonshire whose wife, Georgiana Spencer, became the notorious Duchess of Devonshire, ancestor of Diana., Princess of Wales. The Duke finally took possession of his new acquisition, Wedgwood having spent his allotted year in studying it in preparation for making a copy. It was to stay in his possession until his death in 1809. Although the Vase did not ‘disappear’ as it did in his mother’s short ownership of it, it certainly led a very private life during these twenty three years, living in one of the three homes belonging to the Duke, Bulstrode, Welbeck, or his London residence. What is known for certain is that at some time during the Duke’s ownership, the Vase was damaged again; it received a ‘fracture’ at the hands of Jane, Duchess of Gordon. This fracture caused the base disk to become detached from the Vase and it had to be fixed back on again. There are no more details, so given that the Duchess of Gordon was a political enemy of the Duke, it begs the question ‘What was she doing in his home at all, and in a position to damage the Vase?’
When the Third Duke died in 1809, his son, another William Henry, became the Forth Duke and the new owner. Within a year he had deposited the Vase in the British Museum, as a loan. It arrived there just after the Rosetta Stone, and just before the Elgin Marbles. It has been suggested that this was for safe keeping to protect it from the casual damage such as that caused by the Duchess of Gordon while in the possession of his father. If this is true it is quite ironic, because it was during this period of ‘protective custody’ that the Vase suffered the worst possible damage that could possibly befall any work of art made of glass, and it is a miracle that it was not lost forever.
On the 7th February 1845 the British Museum was half way through a painful process of total transformation. Montague House, its outmoded and outgrown original home, was being slowly demolished and replaced by a new wing known as the Lycian Gallery, which was rising beside it. The Museum was a building site, complete with all the usual mayhem. In all this chaos the Museum tried to conduct ‘business as usual.’ The Vase sat under its glass cover in Gallery Nine, and a handful of visitors strolled about enjoying the last ever look at the Vase in its pristine condition. A young man entered the room and waiting until the attendant had walked into the adjoining Gallery Ten, picked up a large fragment of sculptured rock that was lying nearby, and heaved it at the Vase. If he had scored a direct hit the Vase would have been reduced to an irreparable cloud of dust and splinters, but his aim was off and the greater part of the missile hit the floor, creating a hefty dent in it. Nevertheless, the glass cover was broken and the Vase was smashed into more than two hundred pieces, plus splinters and dust. The noise brought the attendants swiftly to the room where they quickly secured the doors and questioned the five remaining members of the public. Four answered promptly, the fifth had to be coerced, but did reply saying, “I did it,” and was handed over to a police officer. A Trustee of the Museum happened to be on site and it fell to him, with some trepidation no doubt, to contact the Duke of Portland, who had loaned the Vase to the Museum, with news of the ‘most lamentable occurrence which has happened only a few minutes ago…….a monument of your Graces liberality, and of the trust you reposed in our safe-keeping.’ Whatever reaction the nervous Trustee was expecting to receive to his devastating news, it could hardly have been the one the Duke displayed. He assured the Trustee that the catastrophe was something that no amount of vigilance on the part of the Officers of the Museum could have prevented; that no doubt the man that did it was mad, and it was fortunate that his madness had shown itself in this way rather than in injury to human life.
UK Belleek Collectors’ Group Newsletter 34/2 July 2013
Page Page Page Page 51 5511 51
However the young man’s subsequent behaviour proved him not to be mad. He had refused to say anything concerning himself when taken into custody at the Museum, not even his name, but three days later he appeared at Bow Street. In the meantime it was discovered from his landlady that he was from Dublin, and living as William Lloyd at lodgings in Convent Gardens. He was in his early twenties, well dressed, spoke with a cultured southern Irish accent, and was obviously well educated. In Court he explained the reason for not giving his name was that he didn’t want to ‘involve others in the disgrace which I have brought upon myself.’ He also confessed again saying, ‘I certainly broke the vase, and all I can say in extenuation of my conduct, is that I had been indulging in intemperance for a week before, and was then only partially recovered from the effects which that indulgence had produced upon my mind.’ (When I first went to Ireland over forty-five years ago, I remember reading reports of the local magistrate courts where young men up on traffic offences regularly gave the excuse that they were “Bad after the booze.” Same meaning, but not so elegantly put as Lloyd had put it. The amazing thing was that just as regularly, in their case, the excuse was accepted and the proceedings were dropped.)
The proceedings were not dropped in this case, but due to a loop-hole in the law, the punishment was little more than the ‘drink-drivers’ received. The only way the offence could be dealt with was under the Wilful Damage Act, which said any person guilty of damage shall pay compensation, ‘not exceeding the sum of five pounds.’ The prosecutors and Officials from the Museum were not at all pleased with this. It would have serious implications for the Museum as any lunatic could walk in and smash whatever they liked and virtually get away free. The Vase was obviously worth more than five pounds, but it was suggested that as the case the Vase was in was also broken, and was worth less than five pounds, why not charge him with damaging the case. This was done and he was convicted and sentenced to a fine of three pounds; in default committed to hard labour in the House of Correction for two months. As Lloyd could not pay the fine he was sent to Tothill Fields prison, but after only two days was released when an anonymous letter was received at the prison with the three pounds fine enclosed and Lloyd was free.
But the Trustees of the Museum were not finished; ‘Lloyd’ had admitted being a pupil at Trinity College, Dublin and the College identified him as William Mulcahy who had entered in the summer and then disappeared. The Trustees employed a private agent to track down the Mulcahy family with a view to bringing a suit for damages. He found that ‘the father was dead,’ ‘the mother was poor,’ ‘there was no property among them.’ The mother was heartbroken by her son’s disappearance, but blissfully ignorant of the whole affair. When this was reported to the Duke of Portland by the Trustees he was again in a forgiving mood. He would be ‘very sorry to make the Mulcahy family suffer for an act of folly or madness that they could not control.’ And there it ended, William Mulcahy disappearing from the picture, but never to be forgotten as long as the Vase remains in the British Museum. As a result of this sentencing debacle, the law was changed to make sure that any reoccurrence of such wanton destruction would be punished with a jail sentence.
After examination and with the Dukes permission, the Museum decided that a restoration of the smashed Vase was possible. To perform this mammoth task they entrusted the work to one of their in-house craftsmen, John Doubleday. His first act was to commission a watercolour of the fragments by T. Homer Shepherd. This would stand as a record of the enormity of his undertaking. By September of the following year, 1846, the work was completed and the Vase was back on show in the Museum, still on loan from the Forth Duke of Portland. The Vase has been dismantled and reassembled twice since then as a result of glue degeneration, once in 1948-9, and again in October 1989.
This was how things stood, throughout the tenure of the Fifth Duke into that of the Sixth until on the 7th March 1929, the Museum officials were alerted to an announcement in the Times which quoted the catalogue of a forthcoming sale at Christies on the 2nd May, where up for sale would be ‘the world famous and historic vase of antique glass, known as the Portland or Barberini Vase.’ There had been no consultation with the Museum, but there was nothing they could do about it of course. The news caused huge excitement in the press, building up to a crescendo as the sale day approached, resulting in one of the biggest crowds ever seen at Christie’s. The bidding started at ten thousand pounds, going up by the thousand until it reached thirty thousand, and still not reaching the reserve; so it was bought in and the auction was over in a few minutes. Unable to sell his Vase, the
UK Belleek Collectors’ Group Newsletter 34/2 July 2013
Page Page Page Page 52 5522 52
Duke took it home with him, where it remained for three years. Then in 1932 he contacted the Museum and offered to renew the loan provided he could sell the Vase whenever he wished. So it was that the Vase settled back into its old position on show at the Museum.
In 1943 the Sixth Duke died, and a year later the Seventh Duke let it be known that he was also considering selling the Vase. The Trustees enquired the price and were surprised to learn that the Duke was willing to part with it for five thousand pounds, a ‘real snip’ compared with the Christie sale. So an offer was made but it wasn’t until another year had gone by, (there was a war on,) that the deal was signed and the Vase became the property of the British Museum at last. The wanderlust life of the Vase came to a close the day before Armistice Day, the end of the Second World War.
That brings to an end what I set out to do, albeit I didn’t expect it to take so long. I have enjoyed the journey, and have learnt a lot. However I cannot finish without a brief mention of three of the many replicas’ that have been made of the Vase. Most of us will be familiar with one or more of the numerous versions made by The Wedgwood Pottery, on an ongoing basis. Wedgwood’s original, made in black and white jasper ware, took him three laborious years to perfect, and became the worlds first limited edition ceramic.
Left: A Wedgwood replica acquired by the V&A in 1901
Right: The original base of the vase (Wedgwood replica)
Right: the less well known Portland Amphora.
John Northwood of Wordsley near Stourbridge, carved the first ever replica in glass in 1874. He also took three years to complete his version, having taken nine years, working in his spare time, to complete his Elgin Vase, inspired by the Marbles and showing scenes from them carved in clear transparent glass, which he considered a ‘trial piece’ for the Portland. In addition, both are depicted holding the Vase in a statue, Wedgwood at the Museum in Barlaston, and Northwood outside the Merry Hill shopping centre, Brierley Hill near Dudley. (Northwood also has a Portland Vase on his tomb at Holy Trinity Church, Wordsley.)
UK Belleek Collectors’ Group Newsletter 34/2 July 2013
Page Page Page Page 53 5533 53
The third replica belongs to a very exciting event that I was completely unaware of when I started to write this; it is the recent ‘2012 Portland Vase Project’ carried out at the Ruskin Glass Centre in Amblecote, near Stourbridge, to mark four hundred years of glass making in the area. As with all such things this was a team effort, and the planning started in June 2011. When it came to blowing the blank for the vase on the 24th September, a decision was taken on the spur of the moment to go for a ‘triple.’ The ‘flat’ bottomed Portland, the Amphora Portland and the Auldjo Jug, something no one had ever attempted before. By the end of the day there were four ‘flat’ Portland blanks and one each of the Amphora and Auldjo Jug ready for the engraver. The Auldjo Jug was engraved first and was finished for January 13 2012. On January 25th work began on the ‘flat’ Portland. This was finished in time for the Kinver County Fayre on June 17th, just six months later, and was also shown at the bi-annual International Festival of Glass in August. Work on the Amphora was still in progress when I visited the engraving studio in May 2013, and will shortly complete the trio.
Above left: 2012 Portland Vase project co-ordinator Ian Dury, glassblower Richard Golding, cameo engraver Terri Colledge and author Graham Fisher. Pic courtesy of www.kingsleystudios.co.uk, Below: The project team. So who are these modern-day ‘geniuses in glass’ that have out-mastered their Ancient Roman counterparts, doing it so much quicker than their more modern replica producers too? Ian Drury is the Project Manager and financer whose brainchild the Project was. Richard Golding is the glass blower responsible for the blanks, and Terri-Louise Colledge is the wonderfully gifted engraver responsible for the final touch. She is the first woman to engrave the Portland Vase and will no doubt join Wedgwood and Northwood in having a stature to commemorate her achievement. We can only hope that this honour takes place sooner rather than later, so that she will be able to admire it herself. All three are quite rightly destined to go down in history.
This story deserves a book of its own, and that is what it has; see below for details of a wonderful book by Graham Fisher that gives a step by step account of the whole process.
Editor: For more information about Terri-Louise Colledge see her website at: www.terricolledgeglass.com/PortlandVase.html. UK Group members Margaret and David Montgomery have long been advocates of Terri's fabulous cameo work and they introduced Bev and me to her in Stourbridge a few years ago.
UK Belleek Collectors’ Group Newsletter 34/2 July 2013
Page Page Page Page 54 5544 54
Footnote:
The Portland vase has become something of an obsession to some artists, among them Viola Frey - one of her versions of the vase is shown here.
A somewhat more "symbolist" ceramic version of the vase by American artist Viola Frey (1933-2004). Unsold at Cowan's auction 17th May 2013 (estimated $2500-$3500)
Picture Cowan's Auctions: http://www.cowanauctions.com/auctions/unsolditem.aspx?ItemId=102923
B BB Book Sources ook Sources ook Sources ook Sources
1) ‘The Mystery of the Portland Vase’ by Robin Brooks. Published by Gerald Duckworth and Co. Ltd. 2004. (An excellent book that contains far more than information on the Portland Vase.)
2) ‘The Life of Josiah Wedgwood’ by Eliza Meteyard. First published in 1866 by Hurst and Blackett, Reprinted and published by Josiah Wedgwood & Sons Ltd. in 1980 in a limited edition of 1,000 copies to commemorate the 250th Anniversary of the birth of Josiah Wedgwood.
3) ‘The Portland Vase’ by Susan Walker. Published by The British Museum Press. 2004.
4) ‘History of England’ by Lord Macaulay in Four Volumes. (Vol. 1 & 2.) Reprinted by Heron Books 1967.
5)…‘The 2012 Portland Vase Project’ by Graham Fisher MBE. Published by Sparrow Publishing 2012, The Map Room, 18 Highwood Close, Kingswinford. DY6 9XB
Pictures Pictures Pictures Pictures
The Sir William Hamilton was modelled by John Flaxman and appears in the Wedgwood book above.
Xxxxxxxxxxxxxxx